This article explains how to sync new listings in Airbnb to Guesty and import their data to manage them in Guesty, including reservations, guest messages, and historical Airbnb reviews.
After you connect your Airbnb account to Guesty, your existing Airbnb listings automatically sync to Guesty with a “Not connected” status. Once you select which listings to connect, the status will change to "Connected" in Guesty within 24 hours, and set to full sync by default. Guesty then imports the listing's data, reservations, guest messages, and historical Airbnb reviews up to 72 hours.
In most cases, historical Airbnb reviews are imported automatically during the connection process. This ensures your listings retain their review history in Guesty instead of appearing without past reviews.
Learn more about viewing guest review data.
Note:
Airbnb offers a "Display exact location" setting to hide a listing's accurate address. Guesty doesn't support this feature. When you connect an Airbnb listing, Guesty overwrites this setting, making the exact location visible to guests.
To hide the exact location, wait until the listing is connected to Guesty. Then, sign in to your Airbnb account and update the "Display exact location" setting directly on Airbnb.
Before you begin
Check that your listing content and settings in Airbnb follow the requirements below to avoid the import failing.
Your Airbnb account in the Guesty dashboard must be in a “Connected” status.
The Airbnb listing can't be flagged or suspended. Its status in Airbnb must be "Listed" or "Unlisted." You can't import listings with an "In progress" status.
Select one of the Airbnb property types supported by Guesty (e.g., Apartment, House, Villa, Loft). For multi-units, use Apartment, Condominium, or Dorm.
Import listings and sync data
Follow the instructions to add new listings from Airbnb to Guesty and import their data.
Step by step:
- Sign in to your Guesty account.
- In the side navigation menu, click
 Marketing and sales to open the dropdown menu.
 - Under Channel management, select Distribution.
- Select Airbnb.
- Select the relevant account.
- Click
 and then click Sync account to ensure Airbnb and Guesty are aligned.
 - Refresh the page. It may take up to 5 minutes for a new listing to appear.
- To the right of the relevant listing, under Status, click Not connected.
-
From the dropdown menu, select Import.
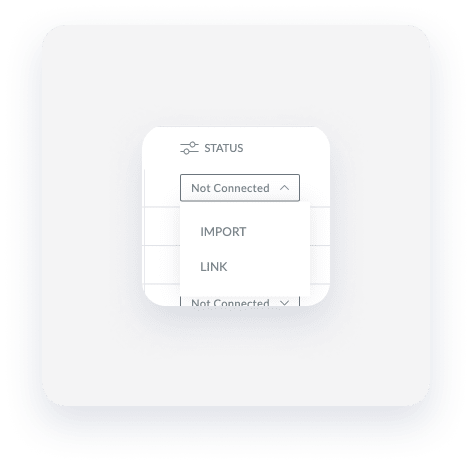
- In the pop-up, enter the nickname and choose if the listing should be created as active.
- Click Import.
The status will change to Connected within 24 hours. Full data import may take up to 72 hours.
How the import affects your listing settings and data
Read carefully how importing a listing affect's the associated data in Airbnb and in Guesty.
| Data type | Details |
|---|---|
| Additional fees | Additional fees set in Airbnb won't be pulled to Guesty. You'll need to configure them in Guesty once the listing is imported. |
| Airbnb Smart Pricing |
Airbnb Smart Pricing will be disabled, and any pricing adjustments will not be imported into Guesty. To retain your preferred rates, update the base price for affected nights manually in the Airbnb calendar before connecting to Guesty. You can use Guesty PriceOptimizer instead. |
| Calendar blocks | Your Airbnb calendar blocks will be imported as blocks to Guesty. If you were previously connected to another PMS, you might have reservations from other channels appearing in your Airbnb calendar as blocks. They'll be imported to Guesty as blocks as well. If you connect to the source channel of these reservations, Guesty will automatically replace these blocks with the actual reservations. |
| External (iCal) calendars |
If you're using an external calendar (iCal): Airbnb disables the iCal connection to avoid conflicting updates. All iCal calendar blocks and notes will be removed from the listing's calendar, and the iCal link will be removed from Airbnb. To prevent data loss, manually replace your iCal blocks with manual blocks in Airbnb before connecting to Guesty. |
| Guest messages |
Guest messages are added to the Guesty Inbox as “Unread”. Only messages from the last 360 days are imported. Important:You can't choose whether to import historical guest messages. By default, Guesty imports guest messages from the last 360 days. Learn more in our Airbnb communication sync troubleshooting article. |
| Guest verification requirements | Guest verification requirements settings are reset. Define them again in Guesty. |
| Historical Airbnb reviews | Historical Airbnb reviews are imported automatically in most cases during the listing connection process. This preserves your listing's existing review history in Guesty after the import. |
| Instant booking / Request to book | An instant booking policy is automatically set for your imported listings. |
| Listed / unlisted status | The listing will be imported in the same listed status as in Airbnb. i.e., if it is listed (or unlisted) in Airbnb, it will be listed (or unlisted) in Guesty. If the listing is imported as unlisted, you'll need to list it to make it bookable. |
| Listing's minimum and maximum nights |
|
| Listing's price per night |
|
| Nickname | The listing's nickname is retrieved from Airbnb. If none is provided, Guesty generates one automatically. Learn more about changing a listing's nickname. |
| Photos |
Photos only sync to Guesty during the initial import. During the import process, Airbnb reduces the photo resolution and this reduction in quality is not visually noticeable. We recommend deleting the imported photos and re-adding the original high-resolution photos in Guesty once the listing is fully connected. Keep in mind that Airbnb imposes a rate limit of 100 deleted photos per week, so plan accordingly when replacing images. |
| Promotions |
All promotions applied to the listing will be removed from Airbnb. You can set the following promotions in Guesty:
And add additional Airbnb promotions (such as custom promotions) in Airbnb. |
| Reservations |
Current and future reservations are imported to Guesty. Note:Due to Airbnb privacy restrictions:
|
| Smart calendar rules (Airbnb's linked calendars) | Airbnb's linked-calendars feature is deactivated. You can set Smart Calendar Rulesin Guesty instead. |
| Sync settings & locked attributes |
The listing sync type is set to full sync by default, meaning rates, availability, and content should be managed in Guesty, not in Airbnb. If you prefer to manage just the listing content attributes in Airbnb (such as the property type, description fields, and amenities), change the sync settings to limited sync once the listing is imported and connected. With Limited sync, you can select a property type, bed type, or amenity that is not supported in Guesty. In addition, you can manage some content attributes directly in Airbnb, using the Airbnb locked attributes feature. You can change the attribute’s value in Airbnb after the listing is imported and connected. The specific attribute will be managed in Airbnb, and “locked” from being changed from Guesty. Learnwhich data types are synced between Guesty and Airbnb for Full sync and Limited sync, and where to manage each data type accordingly. |
| Title and description fields | The listing's title and description fields will be pulled to Guesty. Descriptions in different languages will also be imported (as long as the language is supported in Guesty). The title and description fields will be used as the "default" set for all your channels. |
| Wifi and password |
Guesty imports the wifi name and password from Airbnb when the listing is connected. Update these values in Airbnb. |