After you connect your Booking.com account to Guesty, you can connect your Booking.com listings in two ways:
- Publish your Guesty properties to Booking.com. Create a new property or use an existing property in Guesty and add it to your Booking.com account.
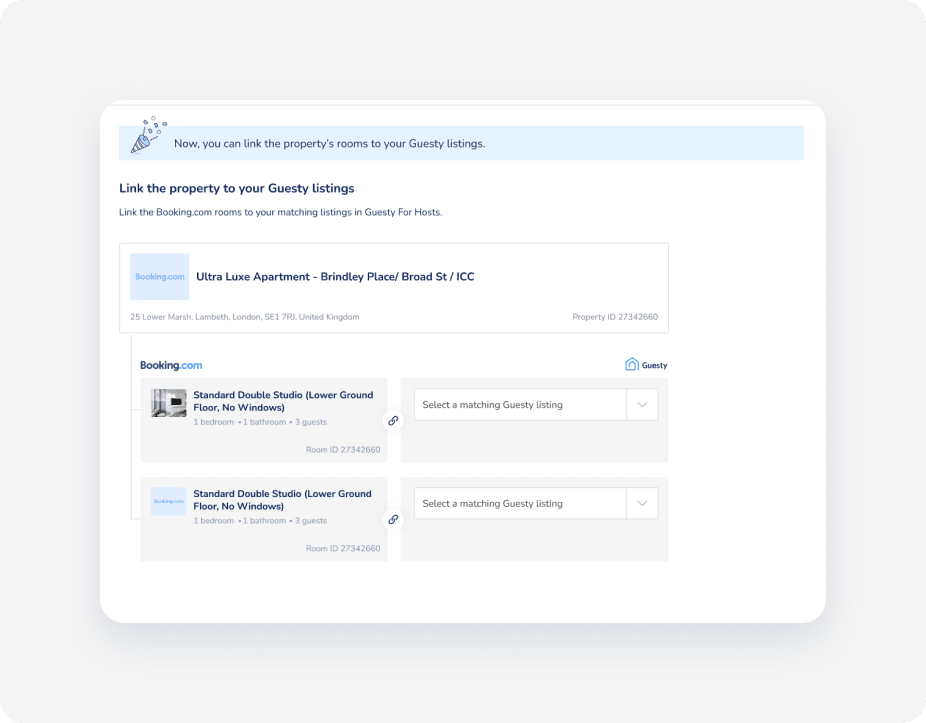
- Link your existing properties in Guesty to your existing listings in Booking.com.
This article explains how to link your Booking.com listings to Guesty.
The default connection type for a linked listing is rates & availability sync. Learn where you should manage your listings, reservations, and guest communication based on this connection type. You can also switch the connection type.
Limitations
- Reservations with past dates won't be imported to Guesty when you link a listing. Learn more about uploading past reservations manually.
- A Booking.com room ID can only be linked to one Guesty listing.
- Only single and multi-unit listings can be linked to Booking.com. Linking sub-units isn't supported. When linking a multi-unit, select the main unit in Guesty, not the sub-units.
Before you begin
- Follow these steps before linking listings to Guesty.
- To integrate a hotel with Booking.com:
- Create each room type as listings under a complex on Booking.com. The complex will be assigned one hotel ID with multiple room IDs.
- Link the hotel with the corresponding complex in Guesty and each room type with the corresponding listing in Guesty. The main complex is displayed first, with each room type in a separate row below it.
-
Rate plans:
- To link a new room to Guesty, connect it to a rate plan on Booking.com before attempting to link it. Only rooms with active rate plans are visible during the linking process.
- When you link your Booking.com listing to a Guesty listing, Guesty automatically deactivates your rate plans on Booking.com. The rate plans or cancellation policy you set in Guesty are used, instead. Rate plans created in Guesty contain "Guesty" in their title, so you can easily identify them in your Booking.com Extranet.
1. Link a property to Booking.com
Watch our video and follow the steps to link a Guesty property to a Booking.com listing.
Step by step
- Sign in to your Guesty account.
- In the side navigation menu, click
 Marketing and sales to open the dropdown menu.
 - Under Channel management, select Distribution.
- Click the Booking.com thumbnail.
- In the Booking.com integration dashboard, verify that the relevant account status is Connected. If it is disconnected, reconnect the account first.
- Select the relevant account.
- Click Start linking your listings (or Link listing in the top right if you have linked before).
- In the Select Booking.com property page, enter the Booking.com property ID and click Next. The property ID can be found in the Booking.com Extranet’s property dashboard.
- In the Link to Guesty listing(s) page, under Matching listing in Guesty, select the relevant listing in Guesty and click Next.
-
In the Listing policy setup page, apply a rate plan or cancellation policy.
Note:
Your selection will override any existing rate plans on Booking.com. Avoid creating rate plans directly in Booking.com once connected.
-
Click Link property to Guesty in the top right.
A hotel ID is automatically allocated and linked to the corresponding listing in Guesty under the relevant LEID account.
2. Finalize the setup in Booking.com
To ensure sync consistency, verify the following settings on the Booking.com Extranet:
- Taxes
- Cleaning fee
- Authorization hold
Troubleshooting issues when linking listings
If a listing doesn't appear in the dropdown menu:
- Ensure the property in Guesty is active and listed.
- Ensure you are linking at the multi-unit level, not directly to sub-units.
- Ensure each unit has a rate plan assigned to it.
- Confirm the number of units in Booking.com matches Guesty exactly. Learn more about reorganizing unit structure for Booking.com.
For additional linking errors see our linking errors guide.