Add custom fields to your properties and reservations to customize specific parameters or preferences. Custom fields help you differentiate between reservations for the same listing.
You can add custom fields as variables to automated messages or apply them to filter or add information to your reservation reports.
Learn more about our best practices for custom fields.
Limitations
Creating and editing
- Each custom field name must be unique. Don't use the same name for different custom fields or for both properties and reservations.
- You can't rename an existing custom field. To change a name, create a new custom field and manually copy the values. Contact us if you need to bulk update a large number of values. Alternatively, delete the field and create a new one.
- You can’t rearrange the order of custom fields.
- You can’t edit the field name, variable name, or type after saving.
Usage
- Don't include default variables inside custom fields. This causes automated messages to fail.
- Nested custom fields aren't supported. Don't include a custom field within another custom field in an automated message.
- Do not use special characters (dashes, parentheses, brackets) in custom field names. Use underscores instead.
- Incorrect:
Minimum-agecreates a{{minimum-age}}variable. - Correct:
Minimum agecreates a{{minimum_age}}variable.
- Incorrect:
Custom field types
Guesty offers two types of custom fields.
Property custom fields
Use these to differentiate between properties. For example, a property custom field like “Dogs allowed” can be set to “Yes” for some properties and “No” for others. You can also use property custom fields to add internal notes to a property.
Reservation custom fields
Use these to differentiate between reservations. For example, a reservation custom field like “Guest birthday” can display “06/11” for one reservation and “08/30” for another.
Create a new custom field
To create a custom field, confirm you have the relevant user role.
Follow the steps below to create custom fields.
Step by step:
- Sign in to your Guesty account.
- In the side navigation menu, click
 Operations to open the dropdown menu.
 - Under Portfolio, select Custom fields.
- Under "Custom fields", select either the Properties or Reservations tab, depending on the type of custom field you want to create.
- Click New custom field.
-
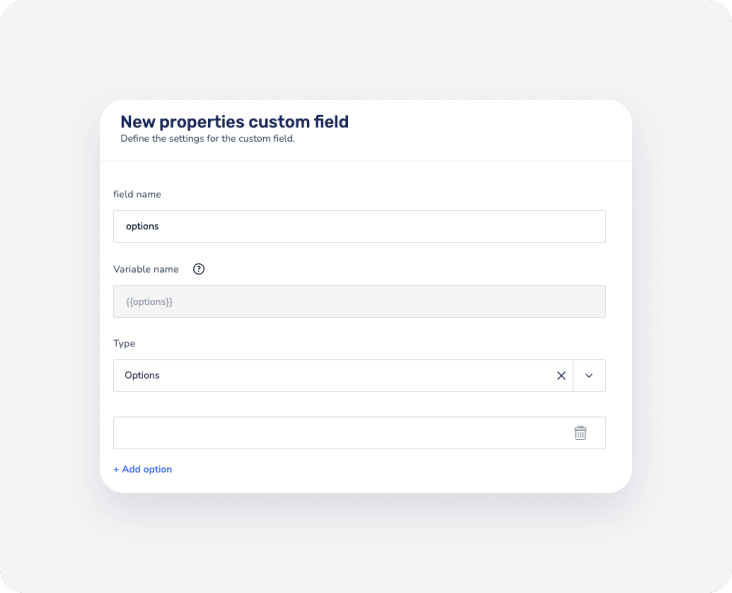
Fill in the required fields:
Field nameEnter a name. The format changes automatically (for example, "Are dogs allowed?" becomes "are_dogs_allowed?").
Variable nameThis is generated automatically based on the field name. For example: {{are_dogs_allowed?}}
TypeSelect a type, such as number, date, free text, or yes/no.
- Select Text for a single line or Long text for multiple lines. Text types have no character limit.
- For Options, add the specific options to associate with the field.
- For Team member or Contacts, finish the setup, then select the relevant option in the property's custom fields section.

- For Day of the week, use the generated variable to schedule automated messages. This is the only variable supported for scheduling.
VisibilitySet the visibility of the custom field according to user permissions.
"Public" is the default setting that enables all users to view the custom field in the reports.
To allow visibility only for users with the relevant permissions, switch the toggle on, and it will change to "Restricted".Mandatory (reservations only)Toggle on "Mandatory" to require this field when creating a manual reservation.
All reservation custom fields will be shown under "Extra information". When creating a manual reservation, you are required to fill in only the ones marked as "Mandatory".
- Click Save to apply changes.
- Adjust the custom field's value in the relevant property or reservation.
Tip:
To set a custom field as a link, select "text" from the type options. Enter the link directly into the text box without additional text. Learn more about adjusting custom field values.
Edit a custom field
You can change visibility or mandatory status after creation. You can't edit the field name, variable name, or type. To change these, delete the custom field and create a new one.
Step by step:
- Sign in to your Guesty account.
- In the side navigation menu, click Operations to open the dropdown menu.
- Under Portfolio, select Custom fields.
- Under Custom fields, click either the Properties or Reservations tab.
- Locate the relevant custom field.
- Toggle "Visibility" (for properties) or "Mandatory" (for reservations) on or off.
- Click Save to apply changes.
Delete a custom field
You can delete a custom field at any time. Deleting a custom field erases its data from Guesty.
Important:
- If an automated message uses a variable from a deleted field, the message will fail.
- Remove any sending conditions based on Yes/No field types before deleting the custom field. Otherwise, the message won't be sent to the relevant reservations.
Step by step:
- Sign in to your Guesty account.
- In the side navigation menu, click Operations to open the dropdown menu.
- Under Portfolio, select Custom fields.
- Under "Custom fields", click the Properties or Reservations tab.
- Locate the relevant custom field.
- Click
 on the right.
 - In the pop-up, click Delete.
- Click Save to apply changes.
View a custom field variable
Follow the instructions below to view your custom field variable.
Step by step:
- Sign in to your Guesty account.
- In the side navigation menu, click Operations to open the dropdown menu.
- Under Portfolio, select Custom fields.
- Under "Custom fields", click either the Properties or Reservations tab.
The variables are shown in the "Variable" column.