A rate plan is a structured pricing package that defines cost and booking conditions for guests. It bundles pricing, cancellation terms, and additional services into one comprehensive offer.
Every rate plan includes:
- Cancellation policy and cancellation fee: Penalties guests pay when they cancel within a specified timeframe.
- Optional add-ons: Meal plans, price adjustments, and booking restrictions.
You offer guests a 10% price reduction for bookings made 30 days or more in advance, include breakfast, and provide free cancellation up to 24 hours before check-in. Late cancellations incur a 50% penalty.
This rate plan only appears to guests who search for stays of 30 or more days in the future.
Learn how to create and manage rate plans.
How rate plans work
Rate plans apply "on top" of a listing's calendar rates and availability settings. Use them to adjust the listing's price per night and minimum nights per stay. You can also control the rate plan's availability by setting an availability range, an advance notice period, or a booking window.
Tip:
Learn how rate plans interact with other pricing tools and availability tools.
Limitations
Reservations that don't meet the requirements of any rate plans can't be booked. A guest will only see a rate plan if their entire reservation dates fall within the availability period of that plan. To ensure your listing is always sellable, create at least one "default" rate plan without any availability settings.
A listing's default minimum nights is 3, and it has one rate plan requiring a minimum of 10 nights. The listing is only sellable for stays of 10 nights or more. Adding a second rate plan without booking restrictions makes reservations of 3 nights or more possible.
Priority rules
If a conflict occurs between the rate plan and calendar settings, the rate plan takes priority. For instance, if both the rate plan and the calendar settings have advance notice requirements, the rate plan’s advance notice requirement applies.
When there is no overlap, Guesty uses the calendar settings.
You create two rate plans for your Booking.com listings:
- Plan A: No restrictions. Price per night and minimum nights follow calendar rates.
- Plan B: 5% price increase per night. The nightly rate is calculated as calendar rate × 1.05. Calendar rates and minimum nights remain unchanged.
Multiple rate plans
Rate plan adjustments don't reflect in the calendar because they apply only to specific eligible reservations. When you set multiple rate plans for the same listing, guests can choose their preferred combination of rates, meals, and cancellation terms.
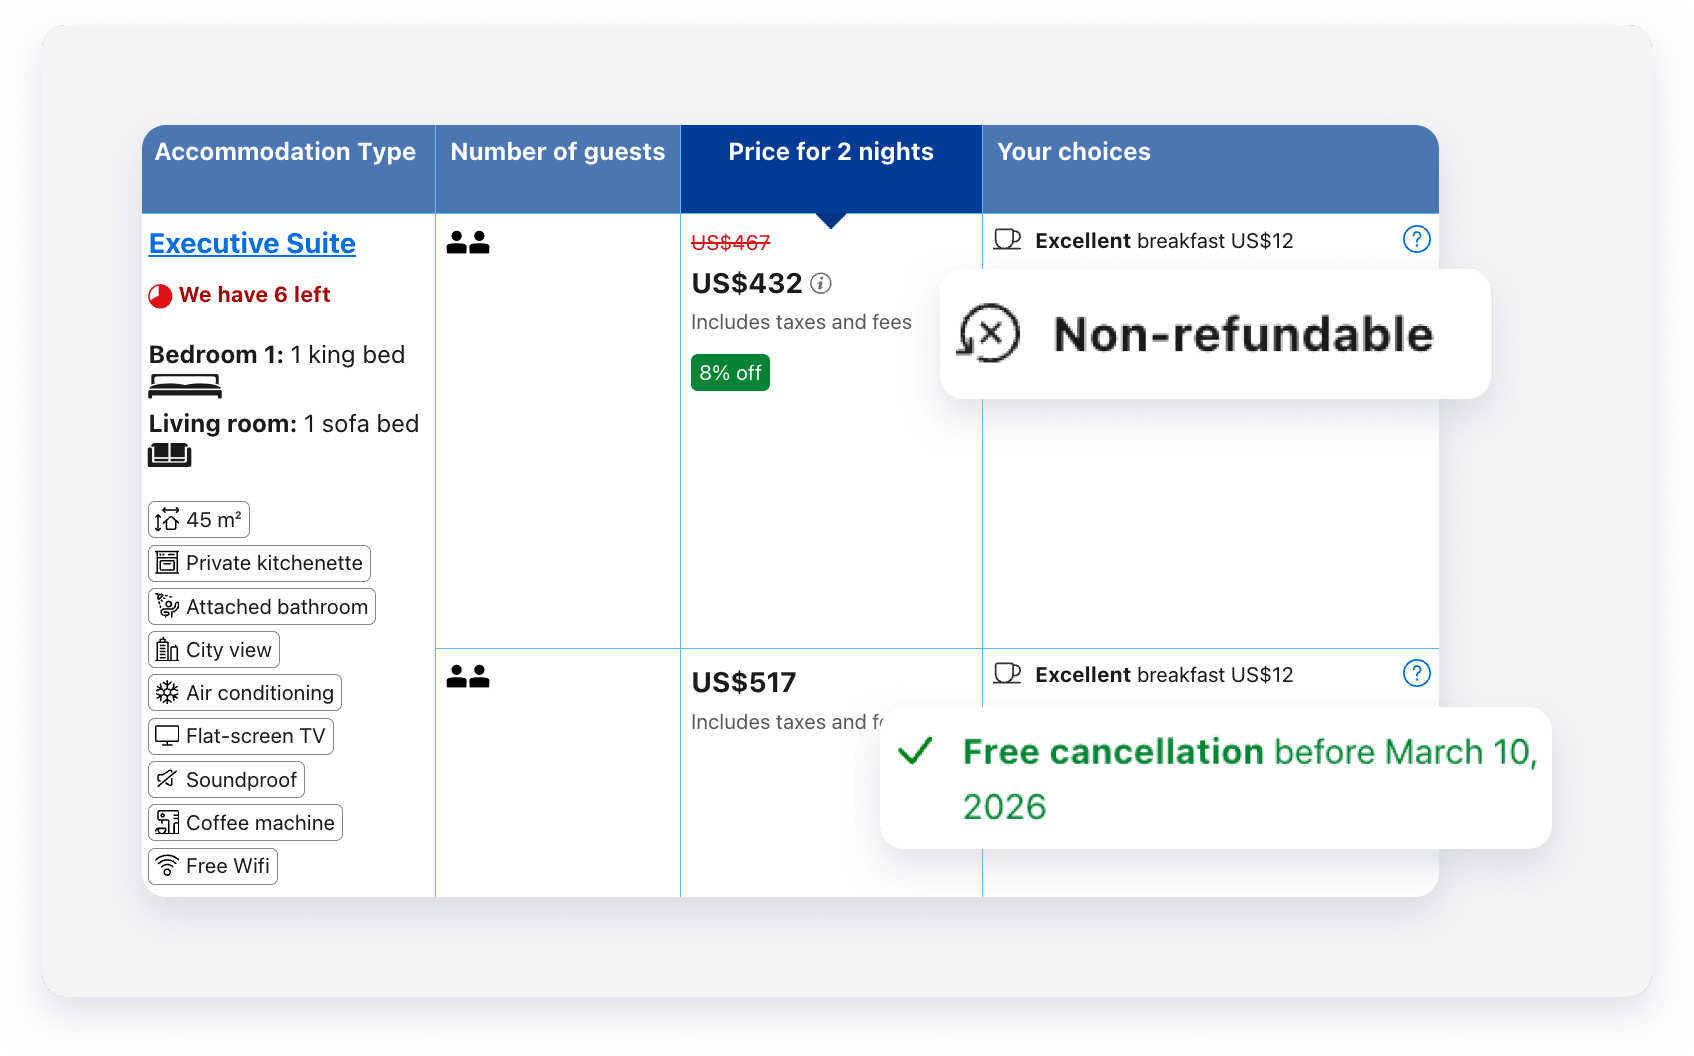
For the same room, dates, and number of guests, a guest can choose between:
- A non-refundable cancellation policy with lower rates
- A free cancellation policy with higher rates
If you set a single rate plan, it activates by default for any reservation that meets its availability restrictions. When you configure multiple rate plans for a listing, guests can choose to book with their preferred plan, provided the reservation meets the plan's specific requirements. For manual reservations, you select which rate plan to apply during creation.
How rate plans work with minimum nights
Rate plans act as an availability layer once you assign a listing to them. You can use this to offer higher rates for stays shorter than your minimum night setting.
If a listing has a 14-night minimum requirement but you assign it to a rate plan with a three-night minimum, guests can book a three-night stay using that specific rate plan.
Rate plans vs. standalone cancellation policies
Consider the following when deciding between a rate plan and a standalone cancellation policy:
- You can apply multiple rate plans for each listing, but a listing can have only one standalone cancellation policy.
- You can update rate plans in bulk, but you must update cancellation policies for each listing individually.
Depending on the booking channel, you can use a rate plan or a standalone cancellation policy for your listing. A standalone cancellation policy includes only cancellation terms and fees, without meals, price adjustments, or booking restrictions.
Channel |
Supported policy |
Notes |
|---|---|---|
| Airbnb and Vrbo | Cancellation policy only | |
| Booking.com and Expedia | Rate plan is required | If you set a standalone cancellation policy, Guesty automatically generates a basic rate plan for it, containing only the cancellation terms and fees you defined. |
| Direct integration sources (Guesty Booking Engine and Google Vacation Rentals) and manual reservation | Either rate plans or cancellation policies | |
| Trip.com | Rate plan is required | |
| Additional booking channels | Set a standalone cancellation policy |
You can configure different rate plans and cancellation policies per channel. For example: a strict cancellation policy for Airbnb, a rate plan for Booking.com, and a moderate cancellation policy for Vrbo.
Switch between a cancellation policy and a rate plan
You can't switch from a rate plan to a cancellation policy in the Guesty dashboard. Stopping the sale of a rate plan makes the listing unsellable under those settings, and adding a cancellation policy won't make the listing sellable again.
Instead, create a basic rate plan without price adjustments or availability restrictions.
You can, however, switch from a cancellation policy to a rate plan. To do this, create a new rate plan or edit an existing one, and assign the listing to it. Once you assign the listing, the rate plan automatically replaces the cancellation policy.
What happens if you don't set a rate plan or cancellation policy
To make a listing sellable and bookable, it must have a cancellation policy (either standalone or as part of a rate plan).
If neither is set, Guesty automatically applies a fully refundable policy for direct bookings. This policy has no penalty fee or minimum notice period before check-in. If you use this automatic setup to apply a different cancellation policy externally, advise your guests of your cancellation terms. If a guest cancels a reservation, you must manually add your cancellation fee to their guest folio.
Configure unique booking offerings
Create a clear and logical offering for your guests by following these guidelines:
- Confirm there are reasonable differences in pricing or terms between different rate plans when they appear together. For example, the more expensive rate plan should typically include meals or a more flexible cancellation policy.
- Add availability restrictions to similar rate plans so they don't appear together for the same reservation. For example, add a maximum number of nights of X to one plan and a minimum number of nights of X+1 to the other.
A listing's base price is $100. You create:
- Flexible plan: Free cancellation up to 5 days before check-in, with a 10% price increase ($110/night)
- Non-refundable plan: No price increase ($100/night)
If a guest books 5 or more days before check-in, both plans appear with a clear price difference — $110 (flexible) vs. $100 (non-refundable). If a guest books 4 or fewer days before check-in, both plans become non-refundable but at different prices, which is confusing.
Solution: Add a 5-day advance notice requirement to the flexible plan. Guests booking within 4 days will only see the $100 non-refundable option.