For users who have an existing Vrbo account, this article explains how to complete Vrbo Self-Service Onboarding (SSO) in Guesty, connect your listings, and manage multiple Vrbo accounts in Guesty as your Property Management Software (PMS).
There are two types of existing users:
- Users who have an existing Vrbo account and don’t have an integrated PMS.
-
Users who have an existing Vrbo account integrated with another PMS and want to switch to Guesty.
When switching your existing Vrbo account to a direct connection with Guesty, Vrbo requires all listings to be published or archived. You can archive a maximum of 250 listings via Guesty during the linking process.
- Published listings will be managed by Guesty.
- Archived listings in Vrbo will be permanently disconnected from Guesty. Reconnecting an archived listing isn't supported.
Before you begin
-
Note:
You can't change the brand once a Vrbo account is connected to Guesty. Instead, connect multiple Vrbo accounts, each with a different brand, to Guesty..
- Guesty validates the email address you provide during onboarding to reduce the number of inactive connection attempts. If you enter an email address already associated with an active connection request, the system prevents you from creating a new one. If you can't start a new connection, ensure there isn't an existing request already in progress using the same email address.
- To prevent your account from becoming stuck or permanently blocked, don't delete, archive, or create new listings on Vrbo until the onboarding process is fully complete. Only make changes to your listing inventory after the initial setup is finalized.
Limitations
- Publishing a complex property isn't supported. This property type, including single units within a complex, won’t appear in the listing selection list. If you need to publish a complex, contact us.
- When publishing a multi-unit property to Vrbo, you can only select the multi-unit (parent unit). Publishing a sub-unit on its own isn't supported.
Vrbo damage protection isn't supported once you connect your account to Guesty.
Once you’ve selected a Vrbo brand, follow the steps below to connect an existing Vrbo account to Guesty.
1. Initiate SSO from Guesty
Follow the instructions below to initiate the SSO process from Guesty.
Step by step:
- Sign in to your Guesty account.
- In the side navigation menu, click
 Marketing and sales to open the dropdown menu.
 - Under Channel management, select Distribution.
- Locate the Vrbo thumbnail and click Connect.
- Follow the instructions below according to your Vrbo user type: new users or existing users.
|
You will be asked a number of questions during the SSO process. It is crucial to select the correct answers according to your user status as outlined below, to avoid being blocked from proceeding.
|
Managing accounts pending SSO approval
A draft account is created when the connection flow starts but the SSO process in Vrbo isn't complete yet. You can delete a draft account to keep your integration page organized 7 days after initiation.
To ensure the system isn't waiting for a response from Vrbo, you can only remove an account if:
- Guesty didn't receive SSO confirmation from Vrbo.
- At least 7 days have passed since the initial connection request was made.
Draft accounts eligible for deletion display a ![]() on the right of the account. This icon only appears if Guesty hasn't received confirmation from Vrbo that the SSO process is complete.
on the right of the account. This icon only appears if Guesty hasn't received confirmation from Vrbo that the SSO process is complete.
2. Connect your account and listings
Follow the instructions to connect your Vrbo account and listings below based on your user status.
Before you begin
- Confirm whether you are managing the properties directly within the Vrbo platform, or through an external PMS provider connected to Vrbo.
- Ensure all properties are disabled from any previous PMS to avoid calendar sync issues during onboarding across multiple channels.
- Guesty doesn't support importing listings from Vrbo. Vrbo listings can only be matched to listings that already exist in Guesty. Create your Vrbo listings in Guesty before proceeding.
Follow the instructions below to connect your existing account and link your listings.
Step by step:
- Click Connect existing account.
-
You will be directed to complete the SSO process in Vrbo in a new tab.
Important:
To successfully complete the SSO process, you must use the email address associated with your Vrbo user account.
-
If the SSO process is incomplete:
Guesty will notify you by email when the SSO process is complete.
When the SSO process is complete, you can continue the process in either of the following ways:
- Click on the link sent via the SSO completion confirmation email Guesty sent you.
-
In your Guesty account, navigate to the Vrbo integration page, locate the relevant account and click Continue connecting account.
Note:
If you finished the SSO process but you see “Continue Vrbo SSO” displayed, wait a few minutes for the sync process to complete.
- There are three ways to proceed from this point:
- Return to the previous Guesty tab.
- Return to the Vrbo integration page and select the relevant account.
- Click on the link sent to you via email.
- Verify status of SSO process:
- If the SSO process on Vrbo is complete, click Already finished? Continue.
- If the SSO process on Vrbo is incomplete, click Tab didn’t open? Try again to be redirected to Vrbo in a new tab to complete the process.
- If there was an error with your SSO validation, you’ll see a red notification. An error can occur if the SSO process wasn’t completed, or if Guesty wasn’t notified upon its completion. Wait a few minutes and then click Already finished? Continue.
-
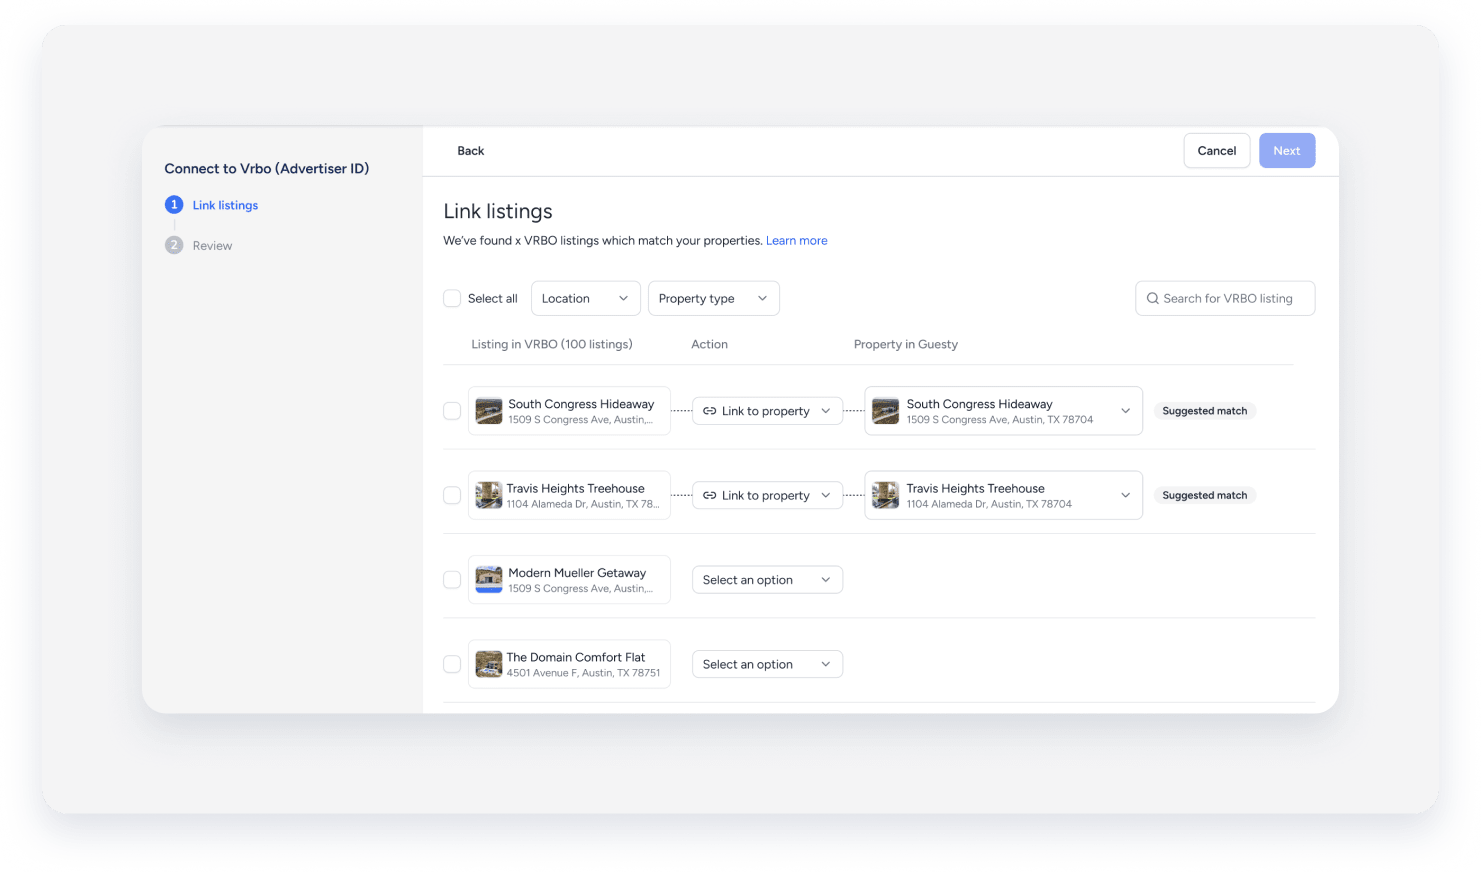
Link your Vrbo listings to Guesty:
You can identify the listing according to the image, name and address displayed. Guesty will provide a suggested match according to the name and coordinates, which you can approve or change as needed. Be sure to review each suggested match.
Important:
Selection of listings during the linking process is final. Once confirmed, links cannot be edited or removed. Double-check your selection to ensure accuracy before proceeding
Once you complete the SSO process, the associated Advertiser ID in Guesty is linked to your Vrbo account automatically. Each Vrbo account receives its own Advertiser ID. You can initiate multiple SSO processes simultaneously and access each one individually. To access an SSO process for a particular Advertiser ID, navigate to the Vrbo integration page, locate the relevant account, and click Continue SSO process.
Filter results
Use the search bar, or filter results according to location and property type for listings on Vrbo. For example, you may want to filter your listing on Vrbo for apartments in Barcelona.
Action
Select one of the following actions from the dropdown menu to link a Vrbo listing to a property on Guesty.
-
Link to property: Approve the suggested property if it’s correct.
Alternatively, select to change the suggested property match in Guesty.
- Select an option: If no suggested property match was found.
-
Archive listing: Select if you don’t want to link the Vrbo listing to a Guesty property, or if you no longer manage this listing. You can archive a maximum of 250 listings via Guesty during the linking process.
Note:
An archived listing remains visible on Vrbo and can be unarchived, however it is permanently disconnected from Guesty and archived in Vrbo. This is an irreversible action. Reconnecting an archived listing is not supported. If you want to link this property in the future, you will need to recreate it and publish it as a new property.
Property in Guesty
You must link all your listings before proceeding to the next step. Select the relevant property from the options below:
- Review and approve the suggested property match.
If there is no suggested property match, or to change the suggested property, select the relevant property from the dropdown menu to match a Vrbo listing to a different property in Guesty. - Search for the listing in the search bar.
- If the property doesn’t exist in Guesty, click Create a new property. You will be redirected to a new tab in Guesty to create the property in Guesty. Once you create and save the property, return to the previous “Link listings” page and select the property from the dropdown menu.
Click Next once all your Vrbo listings are linked to properties on Guesty.
Alternatively, click Cancel to cancel the linking process.
Note:
When you cancel the linking process it is discarded completely. If you plan to discontinue with Guesty as your PMS, contact Vrbo support to update your Vrbo account.
-
4. Review your selection:
If a listing doesn’t meet Vrbo’s requirements, a warning will be displayed.

Follow the instructions below to take action on listings that don’t meet Vrbo’s publishing requirements.
-
Click the dropdown arrow next to the warning to see a list of properties with missing requirements.
Note:
Presented properties will display previous Vrbo titles, however the missing requirements are relevant to the Guesty listing you chose to link to. Since Guesty will become the source of truth for the listing, it’s crucial to ensure all requirements are met.
- Next to the relevant property, click Missing requirements.
-
Under “Action” in the pop-up, click Fix missing requirement for each item. You will be redirected to a new tab where you can make the required changes.
If you choose to skip this step, you can return to review publishing issues later.
Alternatively, click Back to make other changes, for example to link a different property.
If relevant: Listing will be archived:
- Click the dropdown arrow to review the listings selected for archiving.
- Click Back to linking to make changes. Keep in mind that archiving a listing permanently removes it from Guesty, with no option to reconnect it.
If no warning is displayed, continue to the next step.
5. Click Link listings.
The listing’s configurations, such as the cancellation policy, rental agreement, and minimum age requirement, sync from your previous account to Guesty. Any changes made to the listing must be done in Guesty.
Understanding imported reservations
There are two types of existing users who have a Vrbo account, and reservation imports depend on how you manage your properties.
Reservation imports if you manage properties in Vrbo only:
If you manage your properties in Vrbo and don't use a PMS solution, the following rules apply:
- Calendar sync: Reservations sync to Guesty as calendar blocks. If reservations are required for accounting purposes, create a manual reservation.
-
Reservation limitations: Reservations aren't imported. Vrbo doesn't share full reservation data, so you can't modify existing Vrbo bookings within Guesty. Manage all reservations in Vrbo.
Important:
If you are migrating to Guesty and your Vrbo account was not previously connected to another PMS, upload your existing Vrbo reservations manually to Guesty during onboarding to keep your calendar up to date.
Once the onboarding is complete and the integration goes live, don't manually create Vrbo reservation records in Guesty. Future bookings sync automatically to Guesty, and manual entries at that stage cause data conflicts.
- Do not use the
uploaded_VRBOsource.
Reservation imports when switching from another PMS:
If you integrated your Vrbo account with another PMS solution and are switching to Guesty, the following import rules apply:
- Past and future bookings: Guesty imports all future reservations and those with a check-out date within the last 45 days, required to complete the linking process. This includes messages and reviews.
- Active reservations: Any existing reservations previously managed directly in Vrbo sync to Guesty as calendar blocks. If reservations are required for accounting purposes, create a manual reservation.
- Reservation management: Imported reservations must be managed exclusively within Guesty.
- Accounting history: Reservations from the previous year up until the last 45 days are imported for accounting purposes only. Add credit card details manually. These reservations don't include messages.
- Financial breakdown: Specific breakdowns of fees and taxes from other platforms are not supported and will appear as one line item.
- Don't use the
uploaded_VRBOsource.
Once completed, you can manage your listing directly from Guesty. Any changes made to the listing in Guesty are automatically updated on Vrbo, including the listing content, calendar, reservations, guest communication and reviews. Changes made to the listing on Vrbo will not sync to Guesty.
Fix publishing issues
We recommend fixing any listings issues that arise during your onboarding process, however follow the instructions below to fix publishing issues at any time.
Connected listings that display “Show errors” on the Vrbo integration page in Guesty indicate that the listing doesn't meet Vrbo's publishing requirements. To fix any existing errors, navigate to the Vrbo integration page in Guesty and click Show errors next to the relevant account. Follow the prompts in the pop-up.
Follow the instructions below to review listings that require action from the publish queue at any time.
Step by step:
- Sign in to your Guesty account.
- In the side navigation menu, click Marketing and sales to open the dropdown menu.
- Under Channel management, select Distribution.
- Click the Vrbo thumbnail
- Select the relevant account.
- Click Publish queue in the top-right.
- To fix issues, click Fix missing requirement under the "Action" column, make the necessary fixes, and click Done. When you are ready to proceed, click Publish eligible listings.
- If you want to publish a listing to a different account, hover over the listing and click X remove the listing assignment.

Once published, listings are removed from the publish queue and added to the Vrbo integration page in Guesty.
The listing status will display as "Connected" within a few minutes, and your listings will be published on Vrbo.
You will receive a popup confirming a successful onboarding process.

Note:
Contact us if a listing is stuck in "Pending" for more than 24 hours.
For other listing errors, see our troubleshooting guide.
Next steps
Once your account is connected, check that your Guesty integration email address is entered in your Vrbo account. This ensures that messages from guests are received in Guesty, and vice versa.
You must set up auto payment rules in Guesty for each listing you want to publish to Vrbo or an error will occur. The auto payment rules must be set to collect full payment before the guest checks out.
Vrbo requires a portion of the total payout to be charged at confirmation. If your auto payment rules do not include a scheduled "at confirmation" payment, Vrbo automatically charges a small amount― typically less than 0.25% of the total payout―at confirmation. The remaining balance will be charged according to your auto payment rules.
If you managed your Vrbo account via Rentals United (RU), and RU is already connected to Guesty, the pre-existing reservations already exist in Guesty as RU reservations.
After the "software switch" from RU to Guesty, those reservations are migrated to the direct integration with Vrbo, so that any alterations made sync to Vrbo. However, the reservation confirmation codes remain as Rentals United (RU-XXXXXX).
Guest payment methods are not transferred to Guesty. You will need to manage the payments directly from your Vrbo account. Alternatively, you can contact guests for their payment details and add them to Guesty, or send them an invoice.
Messages for pre-existing reservations may not be received in Guesty, since these reservations are associated with the channel manager/PMS integration email. We recommend moving to email communication with these guests.