Use the reservations report to organize and analyze your booking data in one central location. Monitor reservation trends, guest details, and financial data by switching between saved views, applying filters, and customizing columns to focus on the information that matters most.
Owner stays are not included in the reservations report. Instead, download a CSV file with your owner details and stays.
Learn about key financial terms you can add to the report as columns or filters. You can also explore our best practices for building custom reports to address specific business needs and common use cases.
To access the reservations report, sign in to your Guesty account and click Reservations in the left-side menu.
Tip:
Many additional reports are available in Guesty, including a properties report, guests report, tasks report, and recorded payments report.
View reports
Choose a report to view from the left "Reservations" panel. The panel is organized into four tabs:
- All: every report you have access to
- Favorites: views you've saved as favorites
- System: pre-built views provided by Guesty
-
User: reports you've created and saved

From this panel, you can:
- Search for a specific view by its name.
- Add or remove a report from your Favorites tab.
- Click any view's name to load that report instantly.
Add or remove a report from your favorite views
In the views panel, right-click the relevant report and select Add to favorites or Remove from favorites from the dropdown menu.
To permanently delete a view, select Remove.
Create a custom reservations report
Refine your data by applying relevant filters and selecting the columns you want to display. A reservations report can include up to 50,000 rows. If you need a longer report, contact us.
You can also generate a custom report using a prompt, so you don't have to choose filters and columns manually.
Apply filters
Narrow down your report by applying one or more filters. Filter controls appear as buttons along the top of the report. Follow the steps below to filter your report.
Step by step:
- To add filters, in the top-right corner, click Filters.
- In the pop-up panel, select the filter category, such as "Listing" or "Financial".
- Choose the specific filter, or filters, to apply and the relevant value. You can also search for a specific filter by name.
- Once finished, click Apply changes, or click Cancel to exit without making changes.
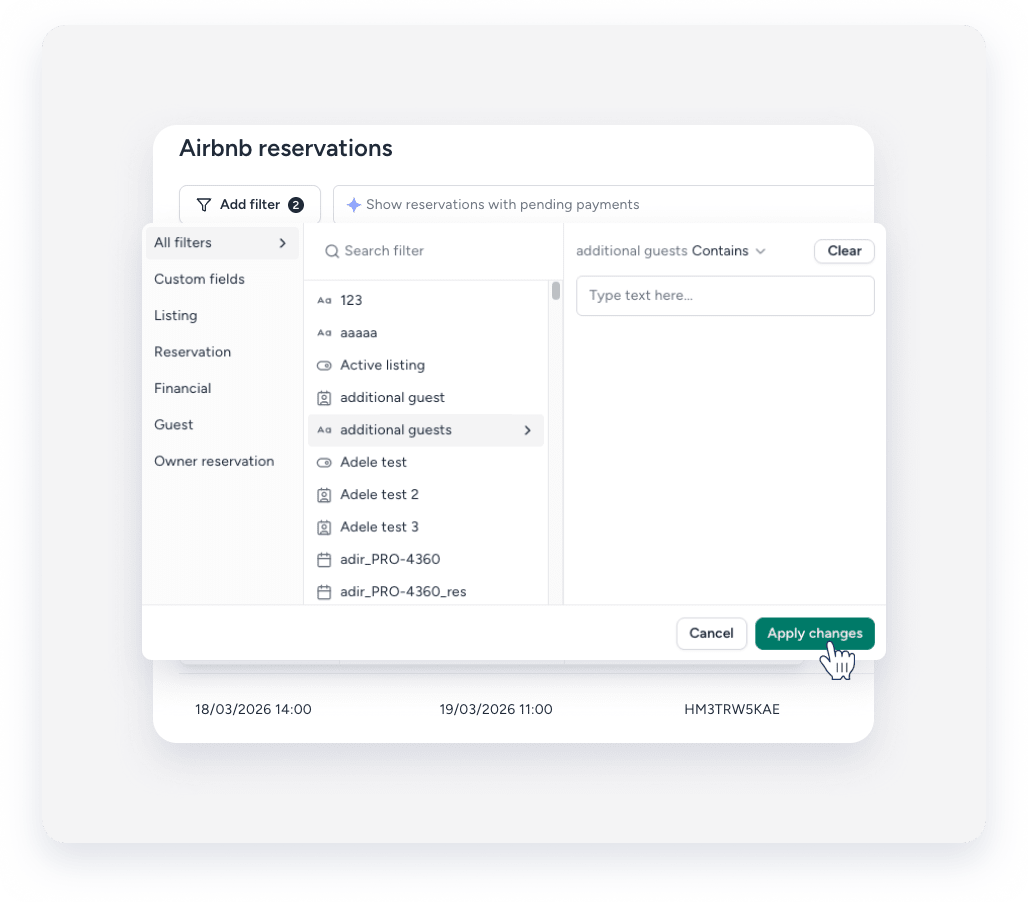
As you apply filters, a running count of matching reservations is displayed on the page.
Customize columns
Choose which data columns appear in your report so you can focus on the information that matters most. Follow the steps below to customize the columns displayed in your report.
Step by step:
- In the top-right corner, click Columns.
- In the pop-up panel, select the column category, such as "Listing" or "Financial".
- Choose the column to apply. You can also search for a specific column by name.
- Check the box next to a column to add it to the report, or clear the checkbox to hide it.
- Click Save to apply your changes, or click Cancel to exit without making changes.

Available filters and columns
Review some of the most commonly used filters. A ✗ indicates the item is not available as a filter or column.
| Name | Options | Filter | Column |
|---|---|---|---|
| Active listing | Yes / No | ||
| Alteration date | Before / After / Between / etc. + date / days | ||
| AutoComply status | ✗ | ||
| Balance due | Equals / Does not equal / Is more than / Is less than / Between + number | ||
| Canceled by | Select from list | ||
| Cancellation date | Before / After / Between / etc. + date / days | ||
| Cancellation request approved | Yes / No | ✗ | |
| Check-in | Before / After / Between / etc. + date / days | ||
| Check-in form submission status | Select from list | ||
| Check-out | Before / After / Between / etc. + date / days | ||
| Confirmation code | ✗ | ||
| Confirmation date | Before / After / Between / etc. + date / days | ||
| Coupon applied | Yes / No | ||
| Coupon code | Select from list | ||
| Coupon discount | Equals / Does not equal / Is more than / Is less than / Between + number | ||
| Coupon internal name | Select from list | ||
| Coupon percentage | Equals / Does not equal / Is more than / Is less than / Between + number | ||
| Creation date (date of import) | ✗ | ||
| Airbnb: Creation date - channel (date of creation in Airbnb) | Yesterday / Tomorrow / Week / Month / Past / Next / Last / Set / Before / After / Today + days | ||
| Early check-in | Yes / No | ||
| Flight number | Contains / Doesn't contain / Equal to {string} | ✗ | |
| Folio status | Select from list | ||
| Fully paid | Yes / No | ✗ | |
| Gender | Select from list | ||
| Guest's name | Contains / Doesn't contain / Equal to {string} | ||
| Guest's tags | Select from list | ||
| Import date | Before / After / Between / etc. + date / days | ||
| Integration | Select from list | ||
| Invoice status | Is / isn't + sent / Payment method received / Invalid payment method | ||
| Is part of a group reservation? | Yes / No | ✗ | |
| Listing | Select from list | ||
| Listing ID | Contains / Doesn't contain / Equal to {string} | ||
| Listing's city | Select from list | ||
| Listing's nickname | Contains / Doesn't contain / Equal to {string} | ||
| Listing's tags | Select from list | ||
| Listing's title | Contains / Doesn't contain / Equal to {string} | ||
| Marital status | Select from list | ||
| Mid-stay relocation | Yes / No | ✗ | |
| Nationality | Select from list | ||
| Number of guests | Equals / Does not equal / Is more than / Is less than / Between + number | ||
| Number of kids | Equals / Does not equal / Is more than / Is less than / Between + number | ||
| Number of nights | Equals / Does not equal / Is more than / Is less than / Between + number | ||
| Number of pets | Equals / Does not equal / Is more than / Is less than / Between + number | ||
| Owner | Select from list | ✗ | |
| Payment method | Select from list | ||
| Payment method last 4 digits | Contains / Doesn't contain / Equal to {string} | ✗ | |
| Payment processor | Select from list | ||
| Planned arrival | Before + time / After + time / Is set / Is not set | ||
| Planned departure | Before + time / After + time / Is set / Is not set | ||
| Platform | Select from list | ||
| Point of sale | Contains / Doesn't contain / Equal to {string} | ||
| Preferred language | Select from list | ||
| Processed by business model | Yes / No | ||
| Pronouns | Select from list | ||
| Purchased upsell | Yes /No toggle | ✗ | |
| Purchased upsell type | Select from list | ||
| Reason for visit | Select from list | ||
| Reservation early check-in | Yes / No | ||
| Reservation id | ✗ | ||
| Reservation late check-out | Yes / No | ||
| Source | Select from list | ||
| Status | Select from list | ||
| Stay dates | Dates range | ✗ | |
| Stay status | Select from list | ||
| Tax | Yes / No | ✗ | |
| Total paid | Equals / Does not equal / Is more than / Is less than / Between + number | ||
| Total payout | Equals / Does not equal / Is more than / Is less than / Between + number | ||
| Total refunded | Equals / Does not equal / Is more than / Is less than / Between + number | ||
| Transaction type | Select from list | ||
| Transportation method (car) | Yes / No | ||
| Transportation method (flight) | Yes / No | ||
| Transportation method (other) | Yes / No | ||
| Transportation method (public transport) | Yes / No | ||
| Transportation method (train) | Yes / No |
Note:
- The "Stay dates" filter displays all reservations that include a date within the specified filter.
- If you encounter a problem adding columns or filters (for example, adding a "resort fee" filter), check that you have at least one reservation with this value. Only values recorded in at least one reservation can be used in the report.
Save a report view
After applying filters and customizing columns to refine your report, click Save as to save the view for future use. In the pop-up, enter a name for your report and check the Add to favorites box to include it in your "Favorites" view. Then, click Save report.
Rename or delete a view
To rename a report or manage its sharing rules, click  in the top-right corner of the report and select Rename or Delete. In the pop-up, enter the new name and click Rename, or Delete.
Note:
Guesty's built-in System views can't be renamed or deleted. You can only modify views that you have created.
Share a reservations report
Share a reservations report automatically via email with contacts and users, or manually generate a secure link for non-Guesty users.
Share the reservations report directly with phonebook contacts or users who have a valid email address in Guesty. To share, click  in the top-right corner. In the pop-up, select the users or contacts from the dropdown. You can add a personalized message.
Toggle on Repeat, and select the days and time to send the report.
Once finished, click Share.
Share the reservation report with non-Guesty users such as owners, cleaners, and operations teams via a secure link displaying live, read-only data. To share, click  in the top-right corner. In the pop-up, select the users or contacts from the dropdown. You can add a personalized message. Once finished, click Share.
Recipients receive an email with the report link, which can be shared through any communication method without requiring a Guesty login to view the report.
Revoke access to a link at any time, or let it automatically expire after one year.
To revoke access, click in the top-right corner and select Manage sharing preferences. In the pop-up, click  next to the link, and click Save.
Expired links generate the following message: “This report has expired. Please contact {account.email} to request a new link.”
Important:
The ability to export data from the reservations report is based on user permissions. If you don't see an option to export, you may not have the required permissions for your role.
Print or download a reservations report
To print a reservations report, click at the top-right corner and select Print.
To download a report, click  . The report is automatically sent to your email as a CSV file. A pop-up also appears in the bottom-right corner; click Download to save the report directly to your device as well.

When downloading your reservations report, two CSV file formats are available:
- Comma-Separated CSV
- Semicolon-Separated CSV
The semicolon format is compatible with spreadsheet tools in regions where commas are used as decimal points (Poland, Germany, France, etc.). Both formats use UTF-8 encoding to support special characters.
To download the report as a semicolon-separated CSV, under "Need a different CSV format?" click Click here.
When working with multi-currency data, make sure to include the Currency column (located under "Payments") in your reservation report before exporting to CSV. Without this column, exported data won't show currency symbols.
To ensure a quick download of your reports, remove any columns that aren’t relevant and sort the report by check-in date.
Tip:
To master setting up customized reservation reports, visit Guesty Academy for interactive courses and step-by-step video tutorials.
