Making your property pet-friendly is a great way to attract more guests and increase your revenue. By updating your house rules and adding specific fees, you can clearly communicate your pet policy to potential guests across all booking channels.
Important:
Guesty doesn't limit the number of pets a property can accommodate.
Channel information
Pet fees sync differently depending on the booking channel. Review the guidelines below before updating your settings.
- Allowing pets appears under "What this place offers" on the Airbnb listing page as part of the listing's house rules in your Airbnb account.
- If you allow pets, you must toggle on Allow pets in Guesty and set the pet fee. If you stop allowing pets, you must remove the pet fee before you toggle off Allow pets.
- To charge a pet fee while keeping a listing on Limited sync: Switch to Full sync, toggle on Allow pets, and switch back to Limited sync.
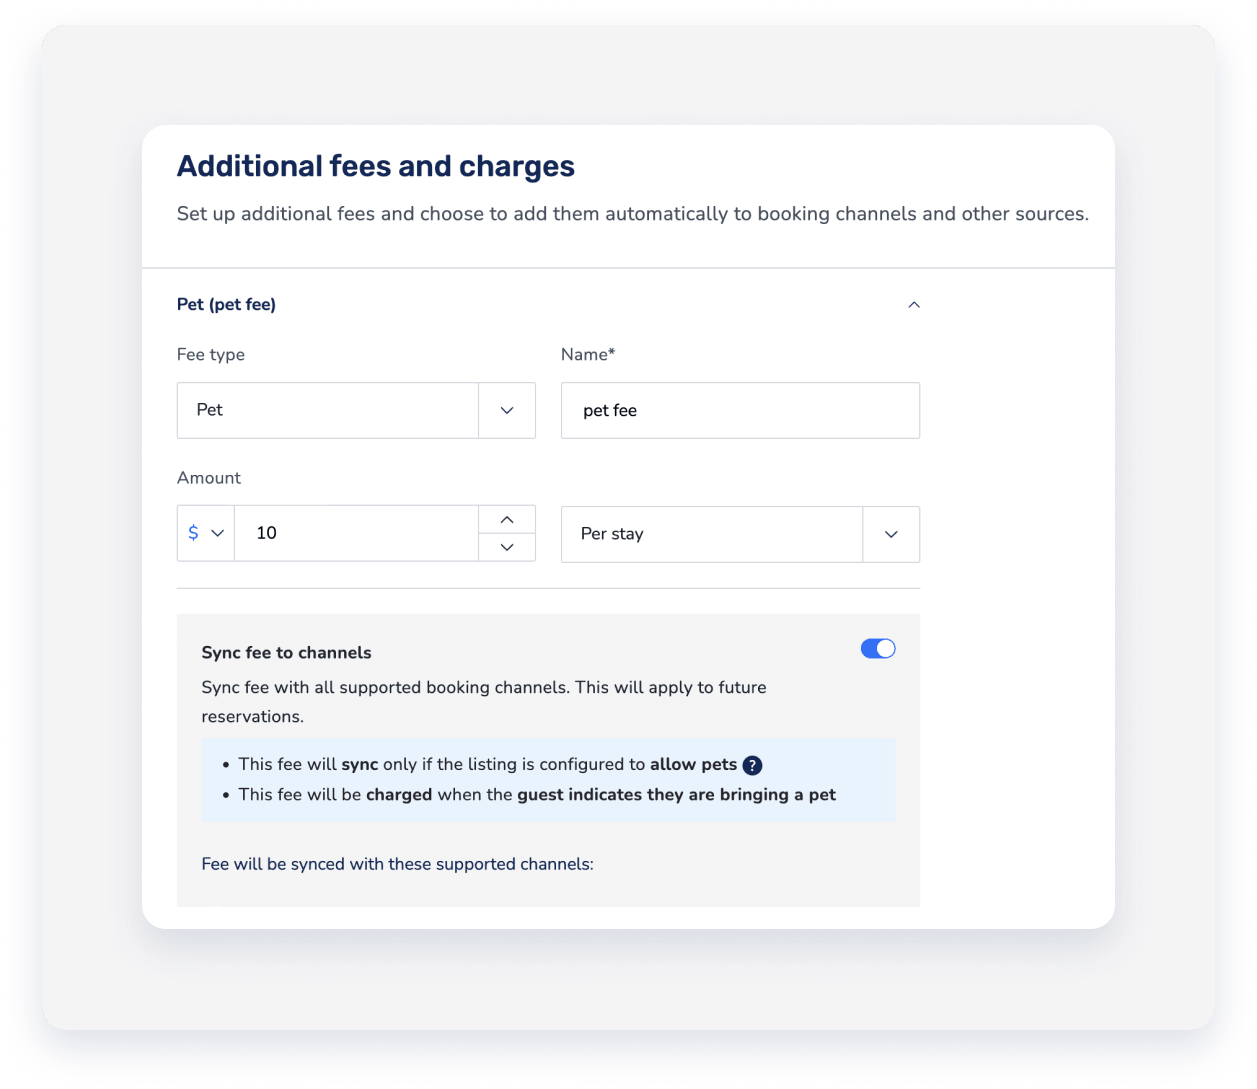
- When adding a pet fee, ensure that:
- The fee is lower than the base price (for example, if the base price is $100, the fee must be $1–$99).
- It is set as a fixed rate, not a percentage.
- Airbnb doesn't require a pet fee for service animals.
- The pet fee is incorporated into the nightly price and not presented individually to the guest.
- Pet settings and fees in Guesty don't sync with Booking.com listings.
- Set your listing to allow pets under the house rules in Booking.com. You can select "no extra charges" or "charges may apply".
- If you allow pets as "charges may apply":
- Create the pet fee in Guesty. This may be synced with other channels, but won't sync with Booking.com. Add the pet fee manually to each relevant reservation.
- Make sure your listing description in Booking.com refers to the relevant charges.
Learn more about offering extra services in your Guesty Booking Engine.
When you allow pets in Guesty, the setting syncs to Vrbo and displays as an amenity on the listing.
Syncs to Guesty
- "Allow pets" appears as an amenity on Vrbo once you enable it in Guesty.
- You can't add pets as an amenity directly on Vrbo. You must manage this in Guesty.
- You can add pet fees and sync them with Vrbo.
Doesn't sync to Guesty
Guesty doesn't support pet limitations (such as type, size, or number). Update these limitations directly in Vrbo.
Set a property to allow pets
Follow the steps below to allow pets on your property.
Step by step:
- Sign in to your Guesty account.
- In the side navigation menu, click
 Properties.
 -
Select the relevant property.
For a multi-unit, edit the main settings. The house rules will update in the sub-units automatically.
- In the left-side menu, click Pricing & policies.
- Select Reservation policies.
- Scroll down to the "House rules" section.
- To the right of "House rules", click Edit.
- Toggle on Allow pets.
- Select the payment option:
- To allow pets for free: Select "Pets can stay for free".
- To charge a fee: Create a pet fee as an additional fee. Then, return to the house rules and select "Charges may apply".
- To allow pets to stay for free, in the "Allow pets" section of the listing's house rules, select Pets can stay for free. Otherwise, continue to the next step.
-
If you want to charge extra fees for a pet's stay, add a pet fee as an additional fee. Then, return to the "Allow pets" section in the listing's house rules, and select Charges may apply.
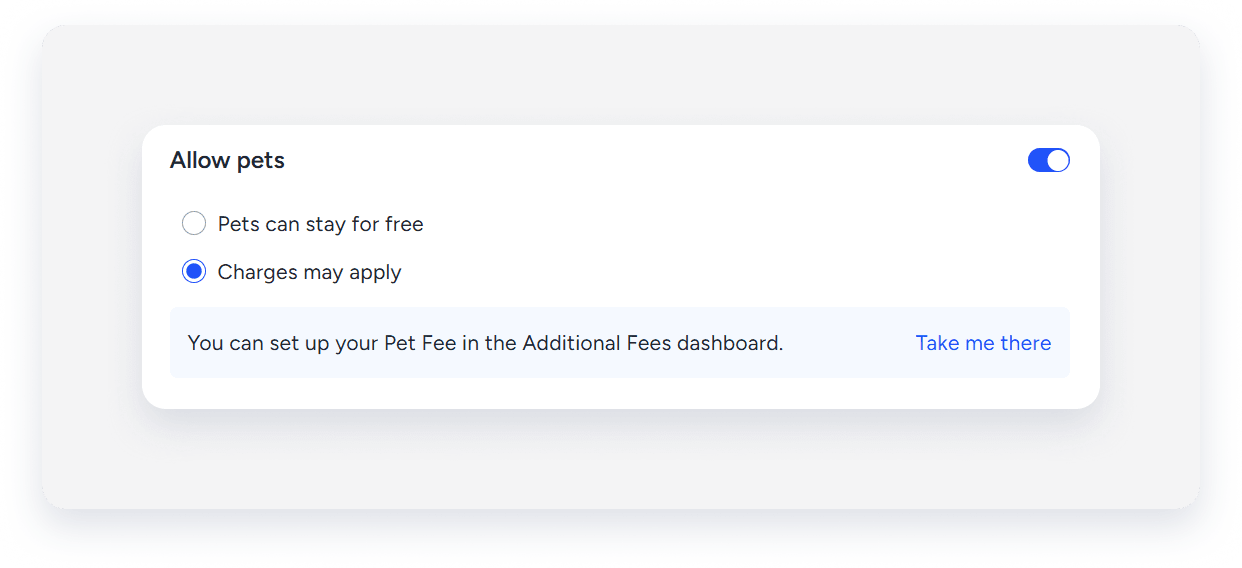
- At the top-right, click Save.
Stop allowing pets
For listings connected to Airbnb: You must remove the pet fee before you toggle off Allow pets. If you don't remove the fee first, the listing will remain pet-friendly.
Step by step:
-
Remove the pet fee from the property.
- If the fee is set in the account settings, removing it will affect all properties using those settings. To remove it for a single property, configure the listing to stop using account settings and add the relevant fees at the listing level (except the pet fee).
- Go to the house rules.
- Toggle off Allow pets.
- At the top-right, click Save.
For listings connected to other channels:
Go to the house rules and toggle off Allow pets.
![]()