Help visitors connect with your business by adding contact, location, and scheduling tools. Use these widgets to share your contact information, display maps, or allow visitors to book services directly from your site.
Use the Google calendar widget to keep visitors engaged by showing them upcoming events, bookings, workshops, and seminars.
Limitations
- Displays public Google calendars only.
- Doesn't display multi-day events.
- Can't be translated:
- The calendar structure, such as days or months, applies the default site language.
- Events display in the language set in Google Calendar settings, regardless of the default site language. When a visitor selects an event, the event popup is in English only.
- If you have added a calendar after connecting an account, the calendar may not appear in the calendar options. To display, disconnect and then reconnect the account.
- Click the widget and select the Content editor.
- Click Sign in with Google.
-
After the account is connected, you will see all public Google calendars associated with that account.
Select the public calendar you want to display and which day of the week you want the calendar to start on.
-
Optional: Toggle on Use 24-hour clock to set your preferred time format.
By default, the time format is set based on the site language. For example, English uses 12 hour format with AM/PM and European languages are in a 24 hour format.
- To add or edit events, go directly to the Google calendar.
- Click the widget and select the Design editor to style the widget.
- To customize the style of the calendar sections, click Calendar. Customize the following:
- Header—month & icon
- Days of the week
- All days
- Events
- Today
- Calendar direction
- To customize the style of the event popup that displays when you click an event in the calendar, click Event Popup. On mobile, events are marked with a dot.
- To customize the style of the calendar sections, click Calendar. Customize the following:
The following fields are supported in the Google Calendar widget:
- Title
- Description
- Date and Time
The following fields aren't supported:
- Location
- File
The Click to Call widget triggers a call to the number in the phone number field when pressed. The Click to Call button is supported on mobile only, as desktops and tablets can't handle phone calls.
Click the widget and select the Content tab.
- Enter the phone number in the field.
- Enter a phone number in the field provided. Use a + symbol before the country code for international numbers.
- Extensions can't be dialed automatically.
- Enter the text to display on the button.
Click the widget and select the Design tab to change the button style and text styling.
Toggle on Floating to set the widget position, and enable Show on this page only if needed.
Use the Map widget to show visitors your business location, event venue, or parking areas.
Click the widget and select the Content tab.
-
Enter your business address in the field provided.
Alternatively, select one of your saved addresses from the dropdown menu. If it doesn't appear, contact HERE Map Creator to update their database.
- Choose to display a map button on specific devices using the "Use button on"
 icons.
 - Enter the text that you want to appear on the button in the "Text on button" field provided.
- To display a location information popup on the map widget :
- Under "Location info popup", enter a title and description for the popup.
- Select to display the popup On hover, On click, or Always from the popup display dropdown.
Click the widget and select the Design tab to customize the map style.
Mapbox is the default map provider, but you can switch to Google Maps for all sites in your account. Guesty saves all Mapbox location data and applies it to Google Maps automatically. You can disable Google Maps and switch back to Mapbox at any time.
To set Google Maps as your default map provider:
- Generate an API key in your Google Maps account.
- Click your avatar in the top-right corner of the integration page and select Account.
- Scroll to "Google Map Integration" and click Set Up.
- Paste your API key and click Apply to All Sites.
To embed maps from Google Maps using the HTML widget:
- Navigate to Google Maps.
- Search for the location you want.
- Click the menu on the top left and click Share or embed map.
- Click the Embed map tab.
-
Copy the URL in the quotes after
<iframe src =". Make sure to copy the complete URL nested in the quotation marks.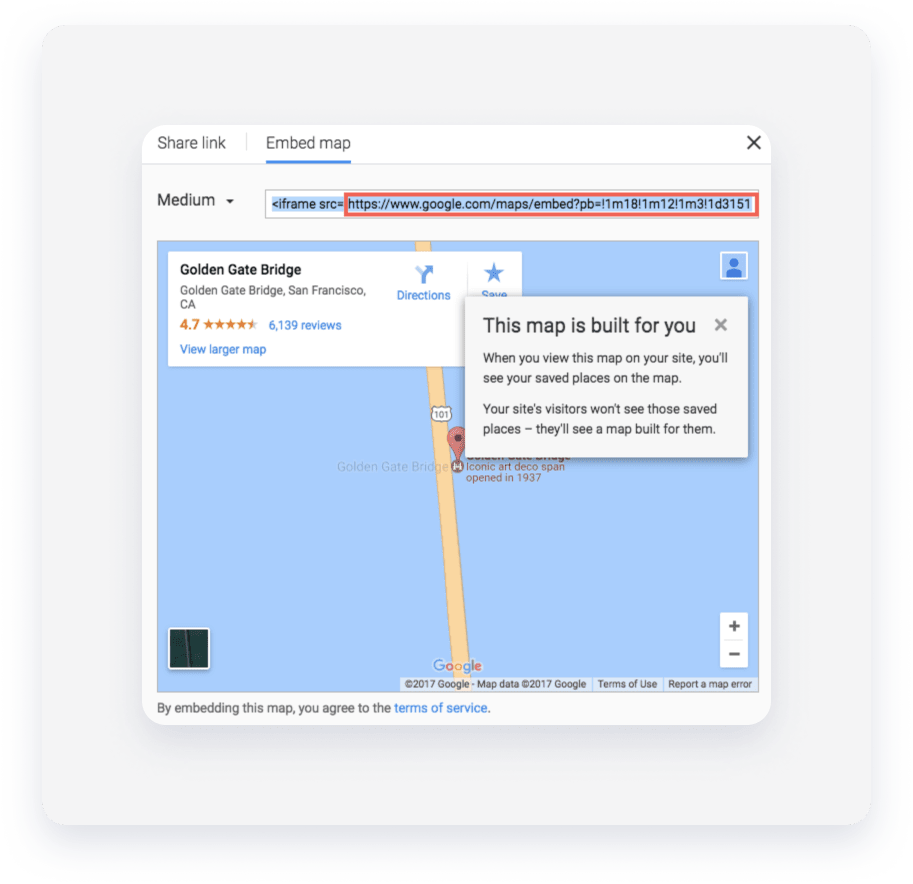
- Navigate to your site.
- Click Widgets in the left panel and drag the HTML widget into a row or column.
-
Use the following embed code and add the URL you obtained from Google Maps in the quotations after
<iframe src =":<div class="embed-container"><iframe src=" " frameborder="0" allowfullscreen></iframe></div> - Go into Developer Mode.
- Click Site HTML/CSS, and then click site.css.
-
Embed the following CSS into this section:
.embed-container { position: relative; padding-bottom: 56.25%; height: 0; overflow: hidden; max-width: 100%; } .embed-container iframe, .embed-container object, .embed-container embed { position: absolute; top: 0; left: 0; width: 100%; height: 100%; }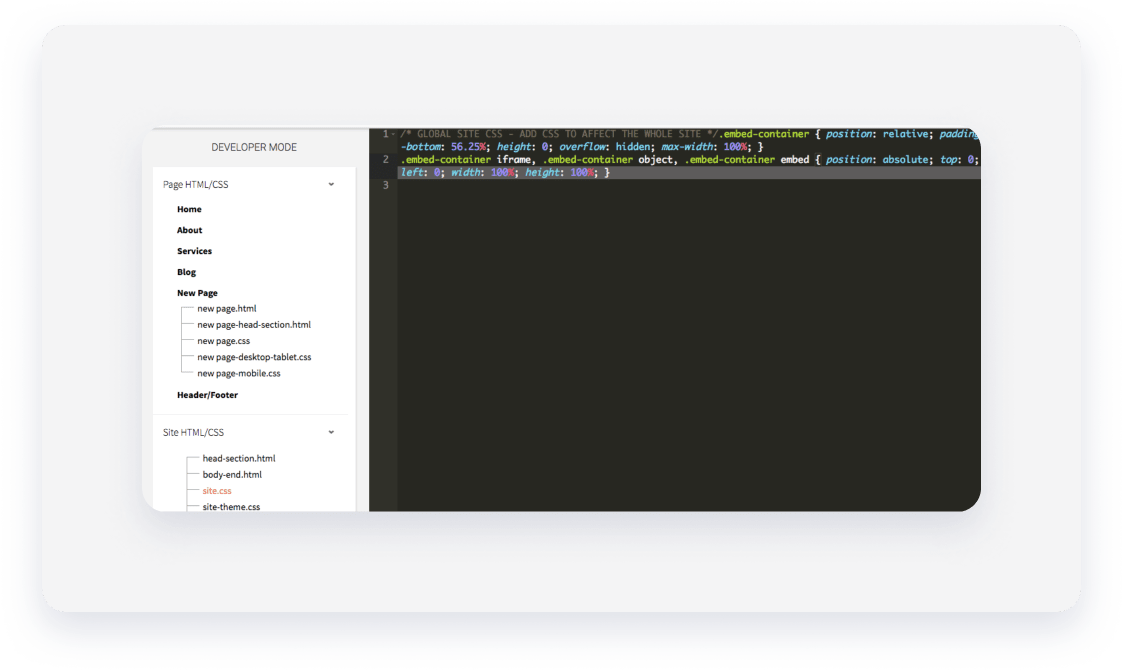
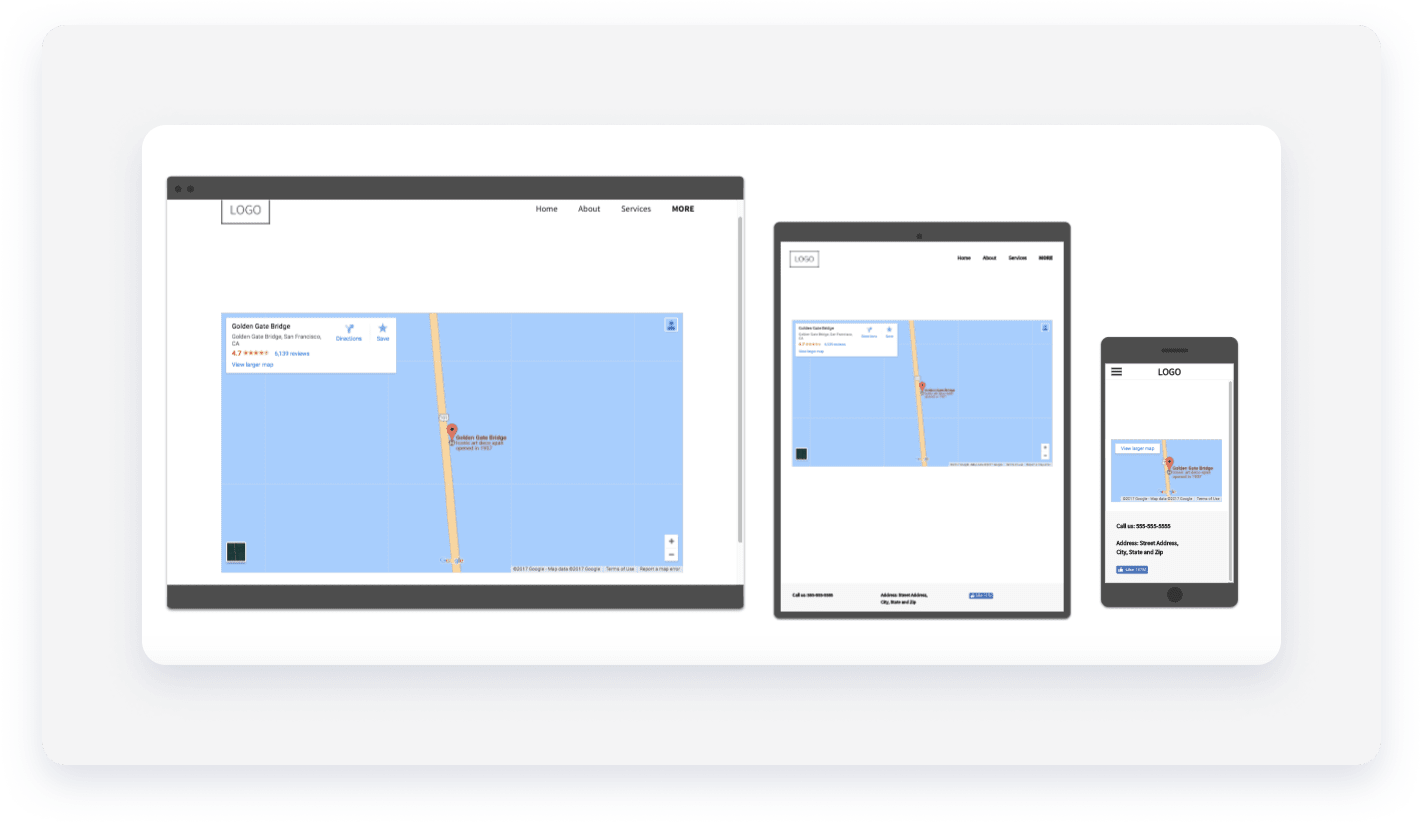
The map resizes according to the screen resolution. If you use the normal Google Maps embed code, the size of the map widget will appear static on all devices and cut off in the mobile view.
Add an OpenTable reservation button to allow visitors to book tables directly from your site.
Click the widget and select the Content tab.
- Enter the "Text on button" in the field provided.
- Select your region from the dropdown menu and enter your OpenTable Restaurant ID.
- Click + Add location to include multiple restaurants.
Click the widget and select the Design tab to change the button style and text.
The Email widget prompts visitors to send an email to your configured email address. Use this on your home or contact pages to speed up communication.
Note:
- Some devices may not support automatic emailing.
- Consider also displaying your email address so that users who can't send an email automatically through their device can send an email manually.
Click the widget and select the Content tab.
- Enter your email address in the field. Alternatively, select an email address previously entered from the dropdown menu.
- Type the text to display on the button.
Click the widget and select the Design tab to change the button style and text.
Toggle on Floating to set a fixed position for the button.
Use the Contact Form widget to gather guest feedback, questions, or newsletter sign-ups. You can customize fields for text, dropdown menus, checkboxes, and file attachments to meet your business needs.
Click the widget and select the Content tab.Under "Form Items", manage your fields:
On the Form Items tab, manage your fields:
- Click the name of the field to modify existing information.
-
Enter the information you want to collect from your visitors.
Note:
- If your form includes a file attachment "Field type":
- The file name mustn't include a space when uploaded
- The file size limit for attachments is 10MB
- Submitted file attachments expire after 90 days
- The following file formats are supported:
.pdf, .xls, .xlsx, .doc, .docx, .zip, .ppt, .pptx, .psd, .txt, .xml, .mp3, .ttf, .otf, .woff, .eot, .svg, .odt, .ott, .js, .css, .png, .jpg, .gif, .jpeg, .rarin addition to all video file formats.
- The Phone number field is validated. An error message appears if formatting conditions aren't met:
- At least one number
- Only valid characters: space, plus sign (+), dash (-), and period (.).
- If your form includes a file attachment "Field type":
- Click + Add Field to add additional form items.
- Enter the desired text for the Form button.
- Manage reCAPTCHA settings to protect against spam:
- Select a reCAPTCHA position.
- Choose to display the reCAPTCHA as an icon or text.
-
Enter a Form title, or click
 to hide it.
Note:
If you change the form title, it only updates after a new response is submitted. Submit a test response to update the name quickly.
On the Submission tab:
- Click New Submission notification to set the recipient email and subject line.
- Under "Form submissions will be sent to", enter your email to receive a copy of all submissions. If left empty, Guesty uses the primary email from your content library or the account owner's email by default. All responses go to the form responses page.
- Under "Email subject line", enter the email subject.
- Under "From name", enter the sender's name. If left empty, the default ‘From’ name will be your site’s web address.
- Click Actions after submission to set up the following:
- Thank you and error messages. Use the rich text editor to customize colors, bolding, or bullet points.
- Redirect settings. Choose to redirect users to a specific page on your website or an external URL.
- Email settings. Toggle on Auto-reply to form submitter option to send a confirmation email. You can also customize the "From" name, subject line, and message body.
- Click Tracking to paste conversion or AdWords code in the field provided.
On the Integration tab
Select a third-party service to send submission data externally if needed. For more information, see Contact Form Integrations.
Click the widget and select the Design tab to adjust the layout, alignment, and button style.
You can link email addresses directly to your Content library or to specific Collection fields. To customize your workflow, you can also:
- Personalize subjects: Add collection fields (like Apartment ID or Team member name) to the email subject line.
- Include external fields: Send additional data points within the form submission.
- Access data easily: These fields are stored and viewable both in the notification email and the Site Overview form responses.
For more information on connected data, see Connected Data.
To add connected data to a contact form:
- Right-click the , and click Connect to Data.

- Select the email address and additional fields you want to include in the contact form email from the relevant dropdown menu.
- Optional: Click the Edit Content tab to make any necessary changes to the content. All changes sync with your content library.
- Click Save.
Gather donations or sell products by adding a PayPal button to your site. You must have a PayPal account to use this widget.
- Click the widget and select the Content tab.
- Enter your PayPal user name.
- Select the Type of transaction from the dropdown menu.
- Set the price, currency, shipping cost, and tax.
Click the widget and select the Design tab to customize the button appearance.
Share your property's meal options with images, descriptions, and pricing. Import your menu from Locu or SinglePlatform, or upload a CSV file.
Choose how to build your menu:
- To build your own menu, select Build Your Own. For more information, see Build Your Own Menu.
- To upload a menu, select Upload CSV. For more information, see Upload a CSV.
Build your own
To build your own menu in the widget:
- Select Build Your Own.
- Organize your menu by creating categories and items:
- To add a category, click Add category and give your category a name.
- To add an item, click Add item under the category you want the item to be placed in.
- To add an image to the item, click + Image.
- Enter a Title, Description, and Price for the item. Use the Rich Text Editor to add color, styling and bullets to text in the description box.
- Toggle on Show images to display images for all items.
- Select a currency from the Choose currency dropdown.
- Type a menu Title, or click
 to hide it.
Upload CSV
To import a menu using a CSV file:
- Select Upload CSV.
- Click Upload CSV, and select the CSV from your computer.
- Type a menu Title, or click to hide it.
CSV Format
Comma-delimited or tab delimited lines:
<Category> , <Item> , <Description> , <Price>
For example:
Desserts, French Cupcake, Cupcake with cream, 15.
Click the widget and select the Design tab to edit category dividers and text styles, and adjust height and font settings to match your branding.
The Yelp Reviews widget only shows positive reviews. Display up to three positive reviews from your Yelp profile to boost customer confidence.
- Click the widget and select the Content tab.
- Enter your Yelp web address page in the field provided, and click the Search button.
- If there is a Yelp page with this URL, it will connect automatically.
- If the URL doesn't connect to a Yelp page, you'll get an error message. Click Enter your Yelp URL again and type another URL.
- Edit the Title of your Yelp reviews, or click to hide it.
Click the widget and select the Design tab to change the review layout.
Display your opening days and times so customers know when to visit or contact you.
- Select the day(s) want to set hours for.
-
Select your working hours for each day.
Alternatively, select from the other options: Open 24 hours, Closed, or Appointment only.
-
Click Set Special Days and Holidays to add exceptions to your business hours.
Note:
Special days and holidays won't display on the widget until the scheduled day is within 13 days. For instance if May 20th is set as a holiday, it won't display on the site until May 6th.
- Toggle on Use 24-hour format to set your time display format.
- Toggle on Combine days with the same hours to consolidate days that share the same working hours.
- Edit the Title of your business hours, or click to hide it.
Click the widget and select the Design tab to change the display options, such as layout, font colors, backgrounds, and spacing.
Display a list or map of all your business locations. Visitors can find the nearest branch and click to call them directly.
Note:
The "Find Nearest Location" button only appears on secure (HTTPS) connections.
- Click the widget and select the Content tab.
- Enter the address of your business to find your location online.
- To add another location, click + Add location.
- Edit the text of the Nearest location button and Multi location title, or click to hide them.
- To edit the location settings, click a location in the list.
- Edit the business address.
- Add additional information, and a location phone number.
- Click to display or hide any items.
- Click Add link to create a link to display on that location's entry to guide your visitors to a specific page.
Click the widget and select the Design tab to style the widget, including:
- Item title
- Additional information
- Click to call button.
Incentivize visitors with promotions. You can build a new coupon in the widget or upload an existing image.
Note:
This widget does not track redemptions. Use terms and conditions to clearly state expiration dates.
- Click the widget and select the Content tab.
- To use the default coupon, click Default Coupon. Complete the following:
- Offer. Enter the offer.
- Main Message. Enter the offer details. For example, "Get a $5 off on your next lunch order."
- Terms & Conditions. Enter any specific terms and conditions for the offer.
- Text on button. Enter the button text for the coupon.
- Show share buttons. Toggle on to include social media sharing buttons.
- Title. Enter the title for the offer.
- Expiration. Select a date of expiration for the coupon. On this date, the word Expired appears on the coupon. To notify visitors in advanced, add the expiration date to the Terms & Conditions.
- To use an image coupon, click Image Coupon. Complete the following:
- Click + Image to add an image.
- Text on button. Enter the button text for the coupon.
- Show share buttons. Toggle on to include social media sharing buttons.
- Title. Enter the title for the offer.
- Expiration. Select a date of expiration for the coupon. On this date, the word Expired appears on the coupon. To notify visitors in advanced, add the expiration date to the Terms & Conditions.
Click the widget and select the Design tab to style the widget.
Capture more leads by allowing clients to book appointments instantly. We partner with VCita to provide this service; you can register for an account directly inside the widget.
- Click the widget the and select the Content tab.
- To create a trial Vcita account, type your email, and first and last name. Click Continue.
- Click the link to receive an account activation email.
- Click Add/Edit services to add a variety of services, fees, and appointment types, such as phone consultations, online meetings, in-person appointments.
-
Click Edit business hours to set your time zone, opening hours, and to sync Vcita with your calendar (Google, Outlook, iCloud etc) to display your availability and avoid double booking.
Users who upgrade to one of VCita's premium plans have additional options to customize scheduling, branding, and more. These features are all linked to within the widget.
Display options
You can change how your online scheduling is displayed on your site.
- Click Service Menu to display a list of services you offer.
- Click Calendar to display a calendar with a list available appointment times for a single service. Select the service from the dropdown.
- Choose to display your scheduling inline on your site, or as a single button which opens scheduling in a new page. Select the display option per device at the bottom of the Content Editor.
Click the widget and select the Design tab to edit styling.