Your Guesty Website's domain is like its street address; it lets other people find it. Setting up your Guesty Website's domain allows people to visit your sites. You can publish your site using Guesty’s default domain or connect a domain you already own.
Connect a custom domain you own
Follow the instructions below to connect a custom domain that you already own to your Guesty Basic Website.
Note:
If you disconnect a domain you own, you must update the domain's DNS setting to the new platform following the disconnection.
Set up your domain in your domain host
Follow the instructions below to set up your custom domain in your domain host.
- Sign in to your Guesty account.
- In the side navigation menu, click
 Marketing and sales to open the dropdown menu.
 - Under Channel management, select Distribution.
- Click Guesty Websites.
- Click Publish.
- In the pop-up, view the options for plans. Check the box to agree to the terms and click Continue to select a domain.
- In the next pop-up, click Use a domain you already own (make sure you added “www.” to the URL), and fill in the URL.
- Click Save.
-
Guesty Websites will search for your domain host provider, and prompt you to log in with your provider (for example, GoDaddy).
Note:
If you encountered an error and need to set up your domain manually, refer to Manually set up your domain in your domain host.
- Type your login credentials for your domain host provider, and click Continue. if you do not own the login credentials, click Forward login to a colleague. Copy the link provided and send it to a colleague to complete the setup.
- You will receive a confirmation message that your domain is now configured. Click Done.
Changes to your domain can take up to 48 hours to go live. If a domain isn't using the registrar's default name servers, Guesty Websites may not be able to correctly add the records.
Guesty Websites searches continually to add more domain host providers. To see a list of all supported providers, see this documentation.
Set up your domain in your domain host manually
If you encountered an error or are asked to make a manual setup, you will be referred to make a manual setting at your domain host provider. You have to add two A records and a CNAME record to your domain host settings, see details below.
Note:
- Two A Records are used for server balance and redundancy.
- Some domain hosts will not allow you to set up multiple records for the @ domain. If this is the case for your domain host, then simply add one record for the @ domain and include both IP addresses.
- If you previously took your website to be live with instructions involving a 301 Redirect and CNAME, you will need to re-create your SSL certificate. For more information, see Add SSL or HTTPS. In addition, you will need to remove the previous settings for the 301 Redirect.
- Adding AAAA and CAA records prevents issuing an SSL certificate. Please ensure you do not have these records configured.
- Most domain hosts have instructions on creating CNAME records and A records in their help center. If you cannot find this information, you must contact your domain host.
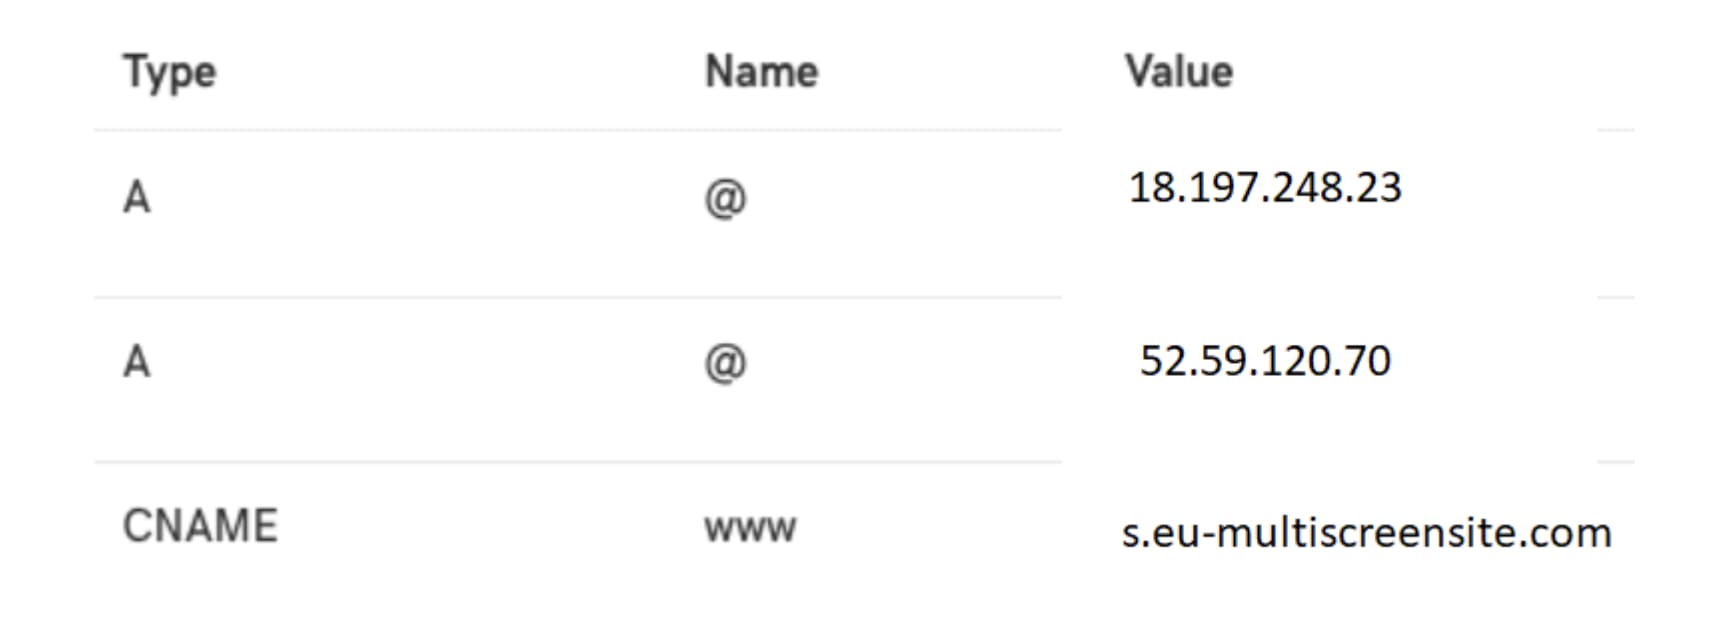
Use the following details for the setup:
- CNAME:
- Host: www
- Points to: s.eu-multiscreensite.com
- A Records:
- A Record:
- Host/Alias: @
- Target/Destination: 18.197.248.23
- A Record:
- Host/Alias: @
- Target/Destination: 52.59.120.70
- A Record:
Examples:
The following is an example from Google Domains, in which they use one A record with two IP addresses:
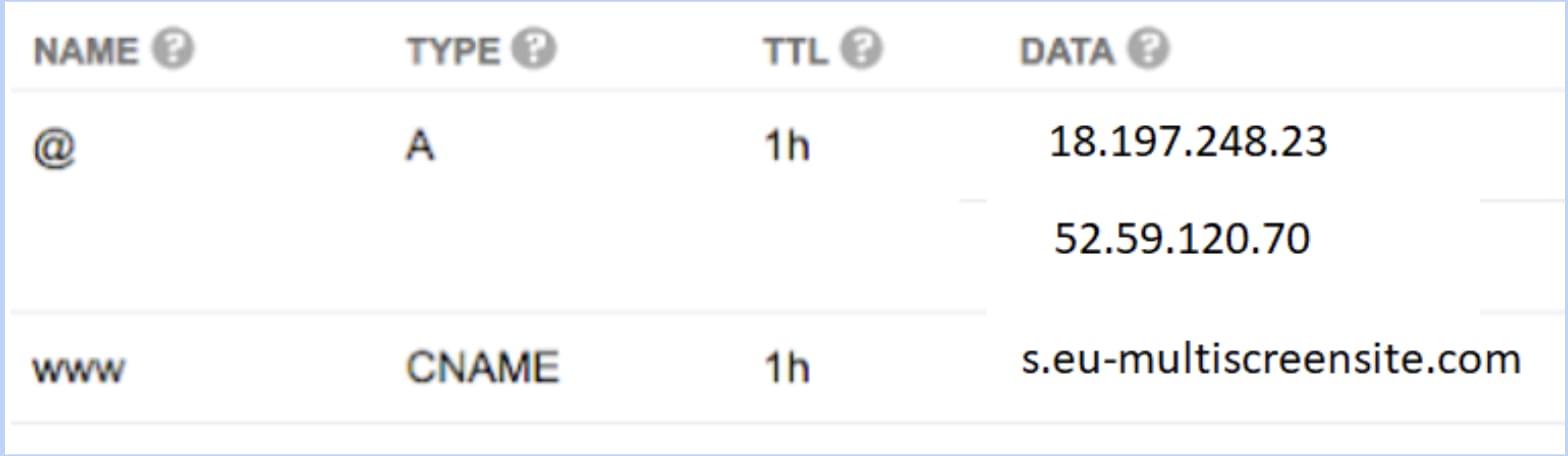
The following is an example from GoDaddy, in which they use two A records (one for each IP):