Note:
Check printing is only available to users in the US, Canada, and Australia.
Efficiently process payments through direct check printing to streamline your financial operations with Accounting by Guesty.
Before you begin
Order check printing stock
You must order specific check stock to use this feature. Follow the steps below to order your check stock:
Step by step:
- Get in touch with Sage to order checks:
- In the US: Visit sagechecks.com, or call 1-800-617-3224 (Monday-Friday, 8am-8pm ET).
- Outside the US: visit Sage Marketplace for regional solutions.
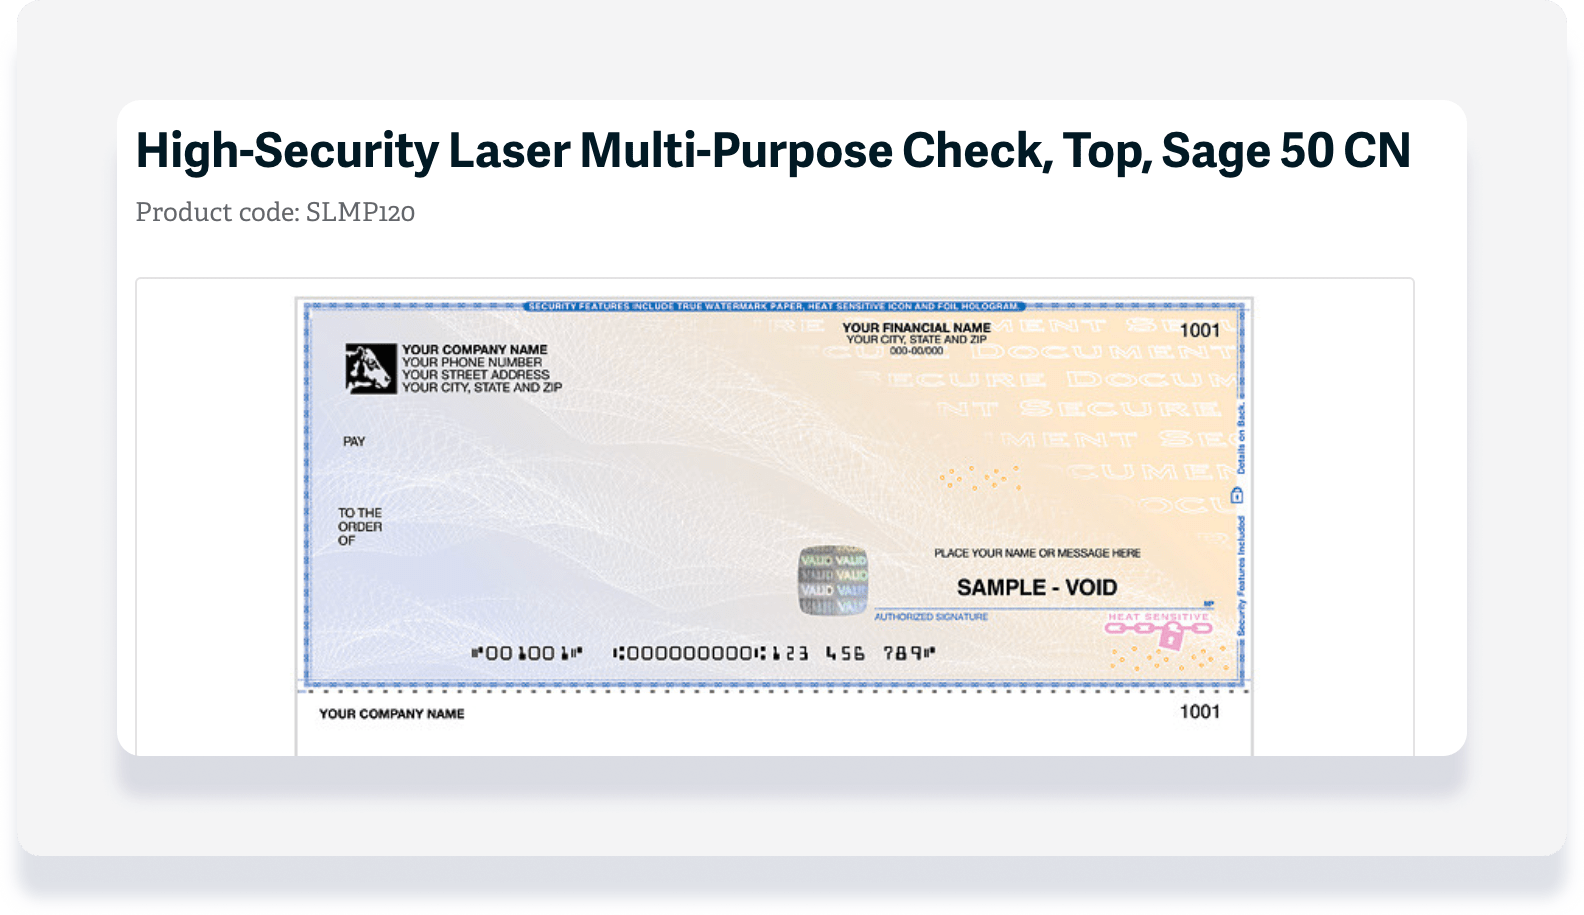
- Place an order for product code SLMP120.
Update your settings
To make printing easier, we recommend updating your computer settings before proceeding. Follow the steps below to update your settings:
- Install the latest version of Adobe Reader.
- Install the latest version of Google Chrome and use it as your browser.
- Verify that your browser's Zoom setting is set to 100% so that text and images appear at their default size, not smaller or larger. In Google Chrome, this setting appears on the browser menu.
- Open a PDF document in your browser, click Print, and in the print dialog box, verify that your system does not add margins or use a "fit to page" setting. In the Google Chrome print dialog box:
- Verify that the Fit to page checkbox is not selected.
- Click More settings, and on the "Margins" list, verify that Default is selected.
Configure owner and vendor payout methods
Set up check printing as a default payment method for your vendors and owners.
Both vendor and owner addresses are aligned automatically to prevent truncation errors when printed onto physical checks.
Set up and print checks
Create filter with outstanding balance column
If you already created a filter, skip to the next section. Follow the steps below to create a filter:
- Sign in to your Guesty account.
- In the side navigation menu, click
 Accounting to open the dropdown menu.
 - Under General ledger, select Trial balances.
- To the right of "Filters," click Ledger.
- From the dropdown menu, select the relevant filter:
- Owners
- Accounts payables (PMC)
- Accounts payables (Vendors)
- Optional: Click the Filter "Balance Date" to change from "today" to a specific date.
- Click Save.
- At the top right, click Columns. In the dropdown, click the toggle to activate "Outstanding balance."
- In the top right, click Save as.
Print one or more checks
Note:
The amount is seen from a trust account perspective. You can select only items that have a negative amount to pay from the outstanding balance column. Items with a zero or a positive balance cannot be selected.
Step by step:
- Sign in to your Guesty account.
- In the side navigation menu, click Accounting to open the dropdown menu.
- Under General ledger, select Trial balances.
- At the top left, click the dropdown menu to select your saved filter. If you don't see the filter, change the view from "Favorites" to "All."
- Select the relevant line item:
- For one item, hover over the line, then click the Pay button that appears to the right.
- For multiple items, click the checkboxes for each relevant item, then click Pay at the top right.
- [BETA] For all items, click the checkbox at the top left, then click Pay at the top right
- In the pop-up, fill out the information:
- Payout name: Enter a name of the entry to display in the posting journal report.
- Payout description: Enter a description that will be displayed in the posting journal reports and on the owner statements.
- Cash account: Select the relevant bank account.
- Payout method: From the dropdown menu, select print check.
- Payout date: Enter the date you're printing the check.
- Reference number: Enter an internal reference number as needed.
- Additional, optional actions:
-
Edit payout amount: Hover over an entry item and click
 to the right. In the "Payout editor" that opens you have the following options:
- Remove a transaction item by clicking the checkbox from the total amount to be paid out. This change is immediately reflected in the "Payout" amount for that entry item.
- Record a partial payment by editing the transaction amount.
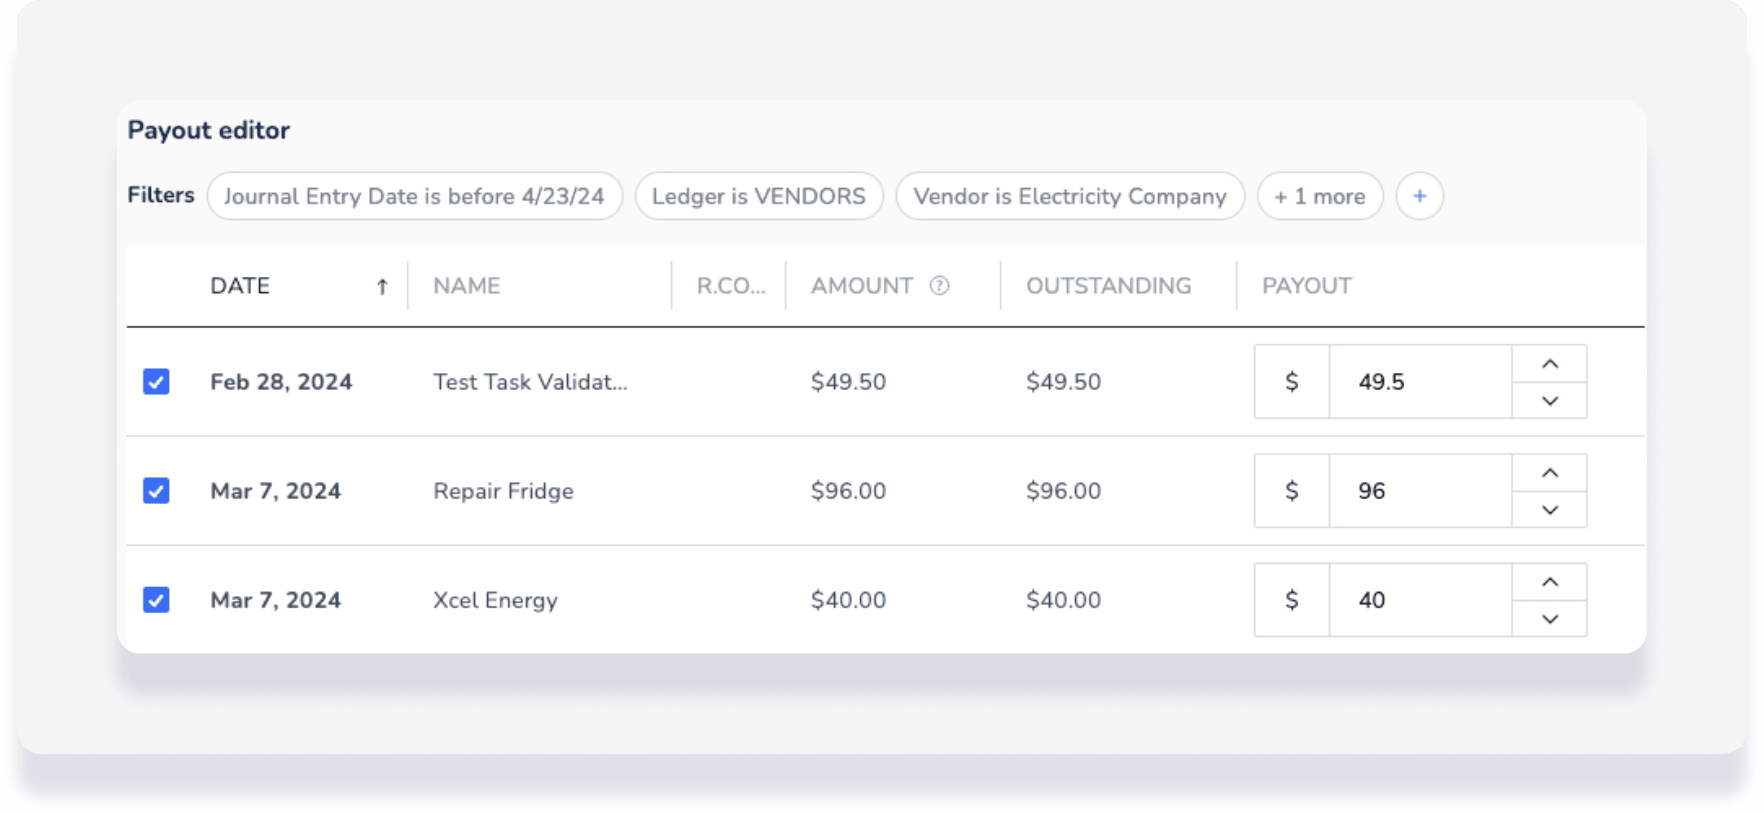
- Remove a payout: Hover over an entry item and click the "x" icon to the left. In the pop-up, click Remove payout.
-
- Proceed based on when you are printing:
- Click Payout to print at a later date. When ready to print, proceed to the next section.
- Click Payout and Print to print immediately. Continue with the below steps.
- In the pop-up, click Confirm.
- Enter the first check number on your stock. The starting check number should match the number printed on your first check in this batch to ensure proper tracking and compliance.
- Click Print checks.
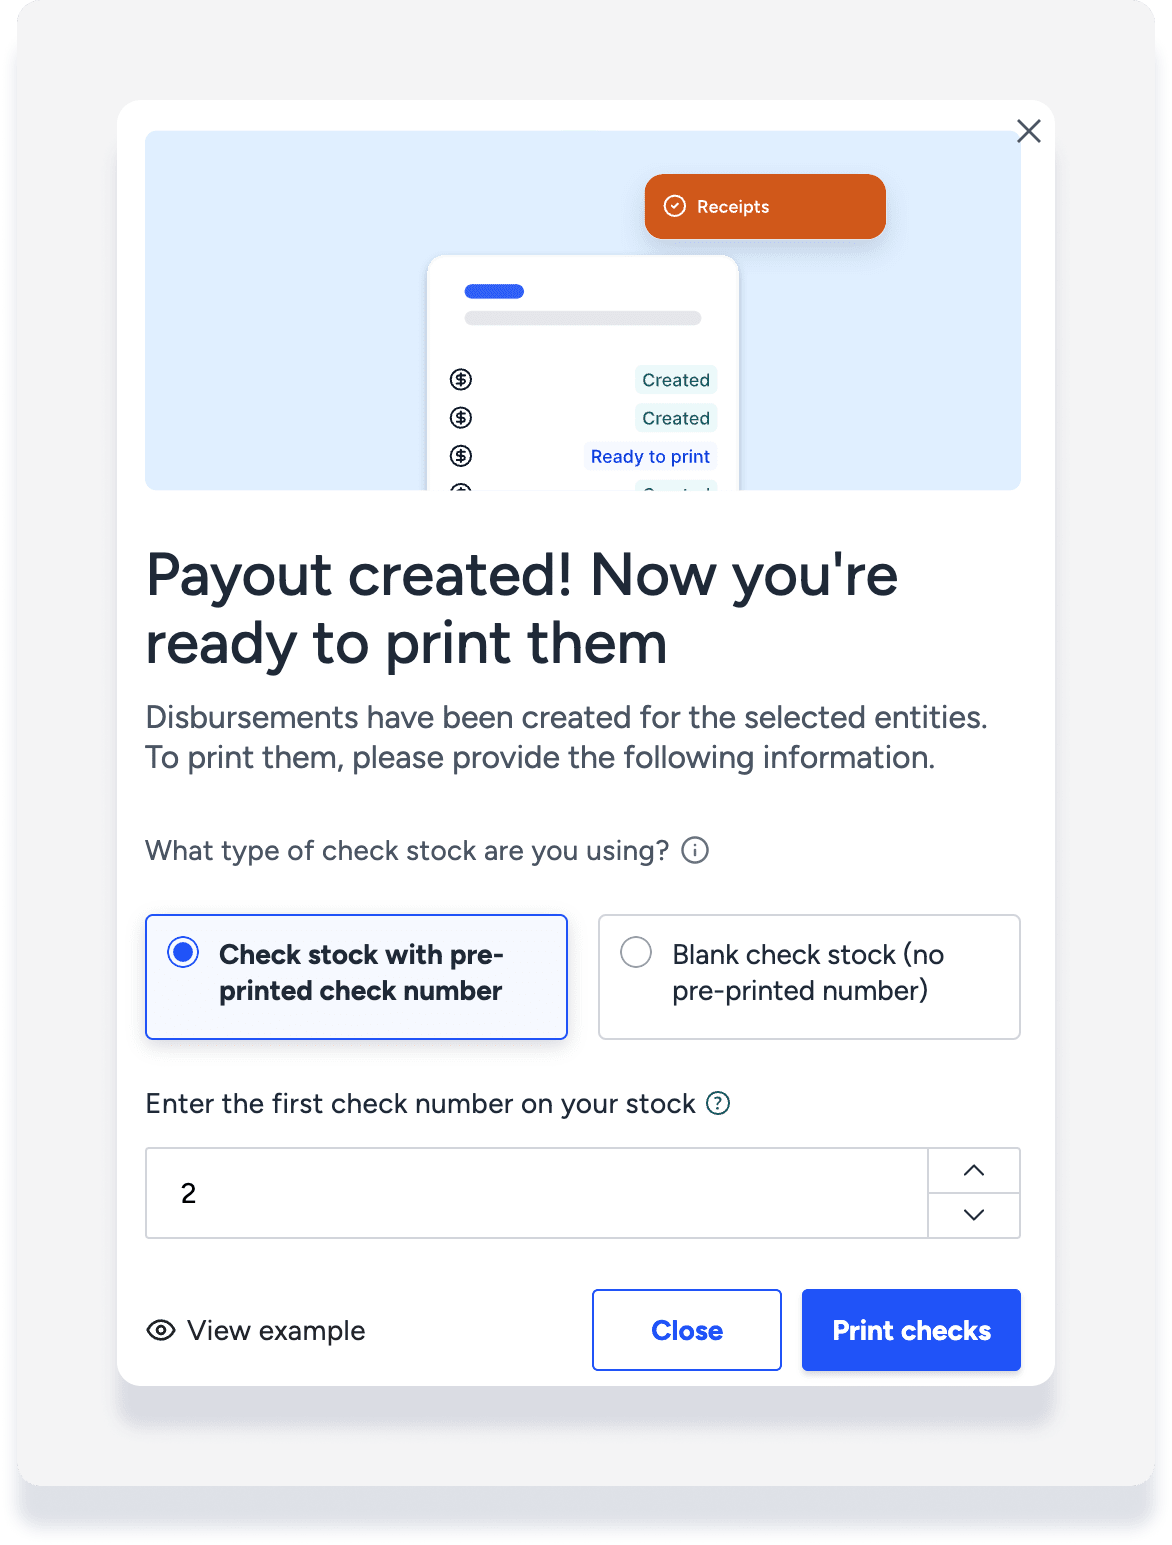
- A new window opens automatically displaying the check details. Review the information, then at the top-right click the printer icon and proceed with printing on your pre-ordered check stock.
Print scheduled checks from Disbursements
If you didn't print checks immediately, follow the steps below to complete the process.
Note:
The pending checks are filtered to your default cash account.
Step by step:
- Sign in to your Guesty account.
- In the side navigation menu, click Accounting to open the dropdown menu.
- Under General ledger, select Disbursements.
- At the top left, click Disbursements then click All to select a different report.
- Click Print checks, then click the star to add this report to your favorites.
- Click the checkbox to select all or specific checks to print.
- At the top right, click Print checks.
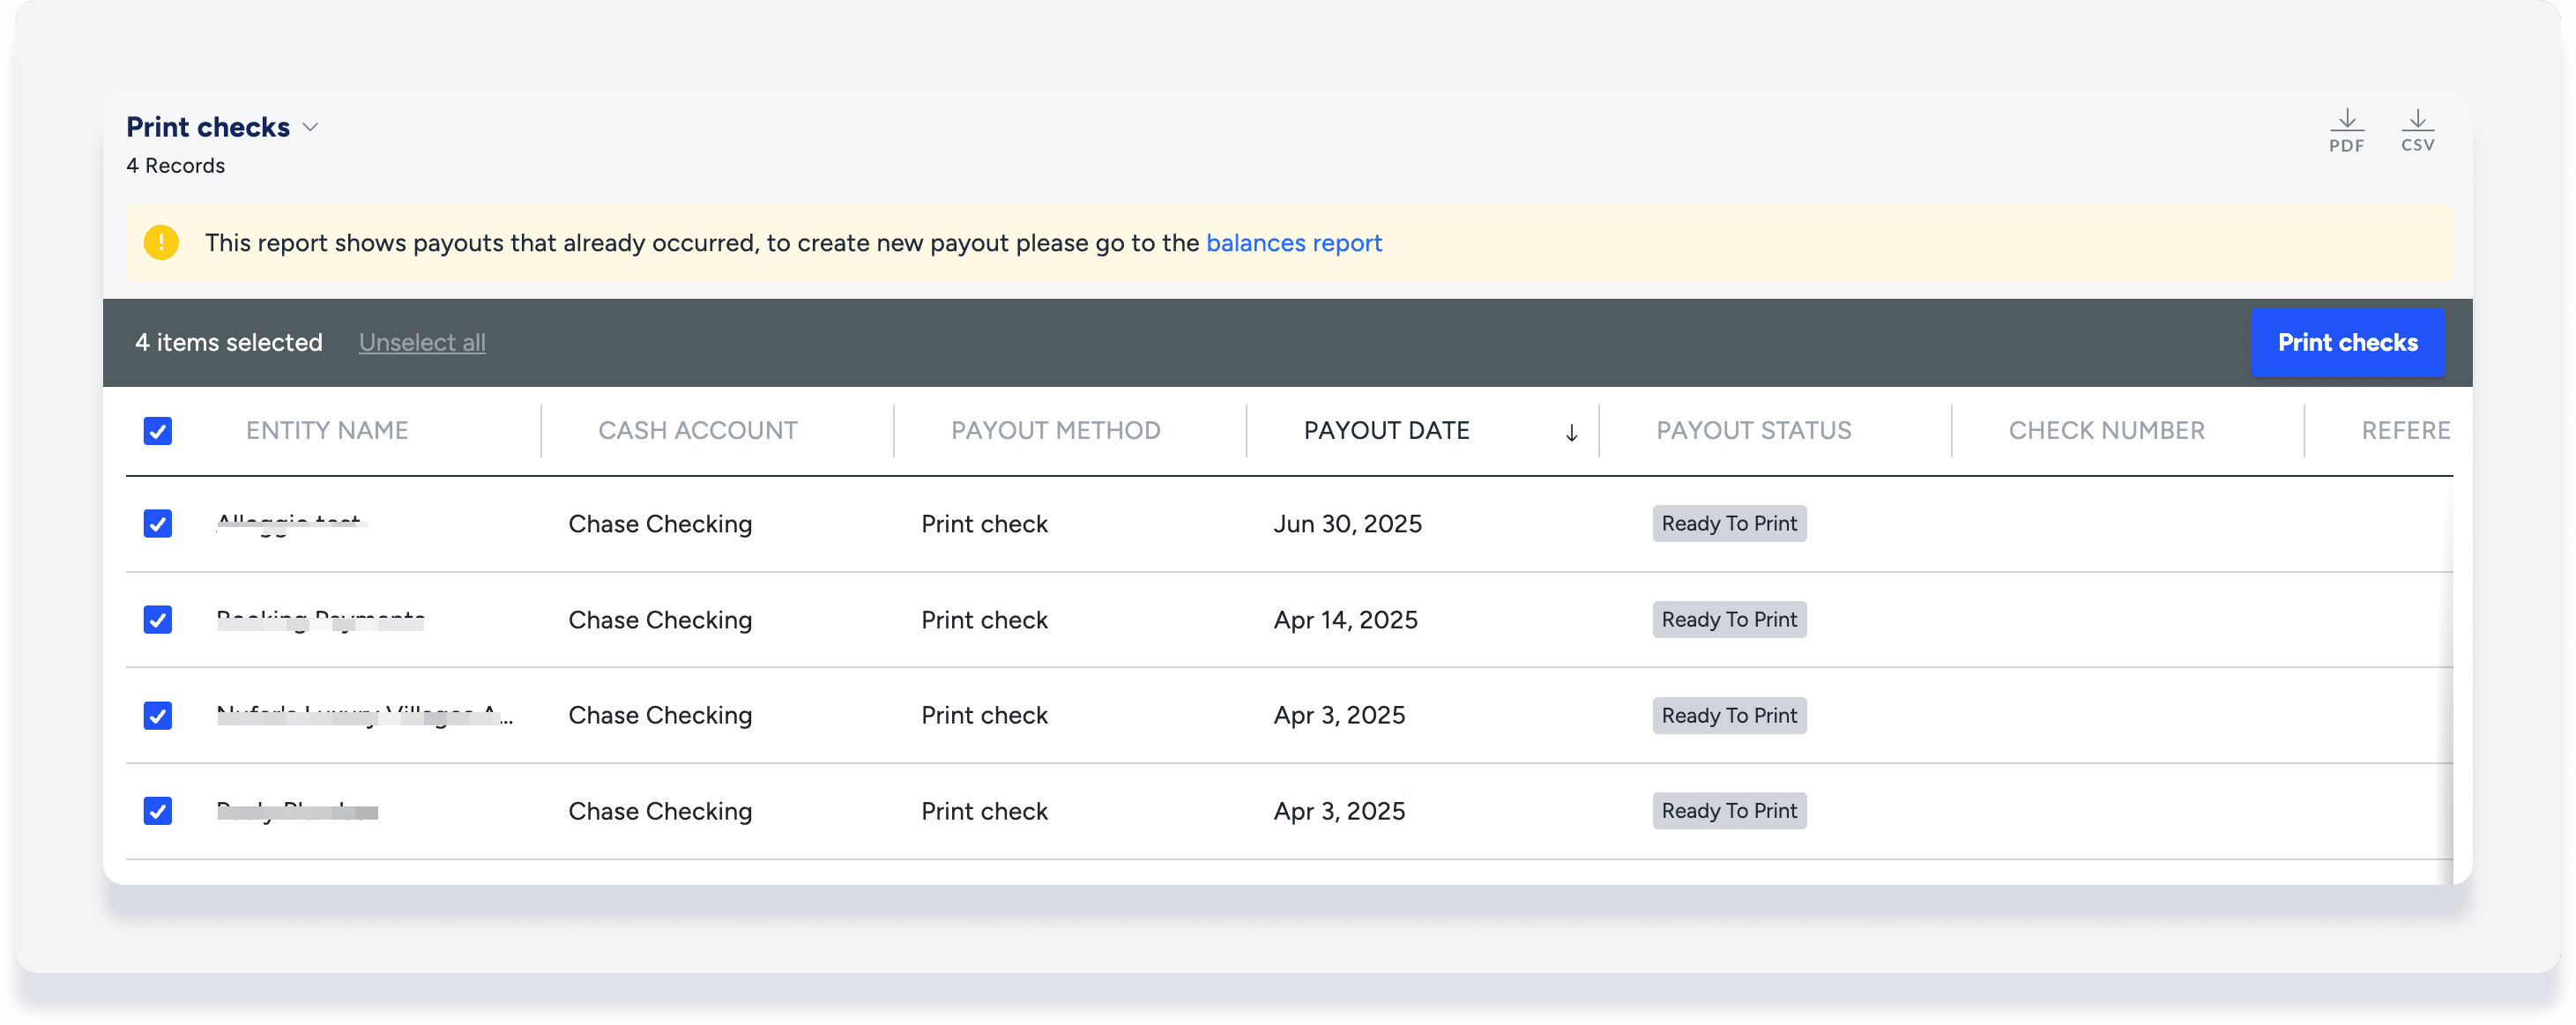
- In the pop-up, enter the first check number on your stock. The starting check number should match the number printed on your first check in this batch to ensure proper tracking and compliance.
- Click Print checks.
- A new window opens automatically displaying the check details. Review the information, then at the top right click the printer icon and proceed with printing on your pre-ordered check stock.
Cancel a check
Cancel a check to remove a disbursement from your records. This action treats the check as if it never existed. If you need to show a record of a canceled check before reissuing a new one, create a manual journal entry to debit cash and credit the relevant accounts payable entity.
Follow the steps below to cancel a check:
Step by step:
- Sign in to your Guesty account.
- In the side navigation menu, click Accounting to open the dropdown menu.
- Under General ledger, select Disbursements.
- Add the filter Payout method and select Print check.
- To the right of the relevant disbursement, click
 and select Cancel disbursement.
